
Part 15 Manual Statement:
Radio and Television Interference
This equipment has been tested and found to comply with the limits, pursuant to Part 15 of the FCC rules. These limits are designed to provide reasonable protection against harmful interference in a residential installation. This equipment generates, uses, and can radiate radio frequency energy and, if not installed and used in accordance with the instructions, may cause harmful interference to radio communications. However, there is no guarantee that interference will not occur in a particular installation. If this equipment does cause harmful interference to radio or television reception, which can be determined by turning the equipment off and on, the user is encouraged to try to correct the interference by one or more of the following measures:
- Reorient or relocate the receiving antenna.
- Increase the separation between the equipment and the receiver.
- Connect the equipment into an outlet on a circuit different from that to which the receiver is connected.
- Consult the dealer or an experienced radio/TV technician for help.
You may also find helpful the following booklet, prepared by the FCC: "How to Identify and Resolve Radio-TV Interference Problems." This booklet is available from the U.S. Government Printing Office, Washington D.C. 20402.
Changes and Modifications not expressly approved by the manufacturer or registrant of this equipment can void your authority to operate this equipment under Federal Communications Commissions rules.
Parts List
Catalog Number 1-07089-00
| APH Number | Item Description | Quantity |
| The Joy Player | 1 | |
| 61-141-226 | Hook and Loop Strap—65" | 1 |
| Instruction Book, Large Print | 1 | |
| Braille Note | 1 | |
| 61-141-225 | Bag of black caps and black rings | 1 |
| 1-07092-00 | Recharger (12v) | 1 |
| 1-02612-00 | USB Cable | 1 |
| 1-02609-00 | Blank DTB Cartridges | 2 |
APH number items may be purchased separately.
American Printing House for the Blind, Inc.
P.O. Box 6085, Louisville, KY 40206-0085
shop.aph.org
Field Test Acknowledgements
The American Printing House for the Blind gratefully acknowledges and thanks the following professionals who field tested The Joy Player.
- Monique Bird, M.A., CCC-SLP, Tennessee School for the Blind, Nashville
- Marie Maletic, MSLP/CCC-SLP, Western Pennsylvania School for Blind Children, Pittsburgh
- Elaine Osborne, Special Education Department Chair/IC, Hunt Middle School, Frisco, TX
- Rebecca Renshaw, Educational Director, Western Pennsylvania School for Blind Children, Pittsburgh
- Mary Vaughn, Teacher of Students with Visual Impairments, SPED, New Mexico School for the Blind, Alamogordo
- Vicki Wolczyk, M.A., CCC-SLP, Tennessee School for the Blind, Nashville
Introduction
The Joy Player is a personal electronic device that allows individuals with visual and multiple impairments to access music and audio books. The product was conceived and designed at the American Printing House for the Blind (APH) during the development of the Sensory Learning Kit (SLK). The SLK includes a personal music player routine that can be performed with any switch-adapted music player. The Joy Player differs from other music playing devices on the commercial market and from the National Library Service's Digital Talking Book Player because it is designed to accommodate individuals who have limited hand use because of motor impairment, and cognitive disability, in addition to a visual impairment.
Player Description
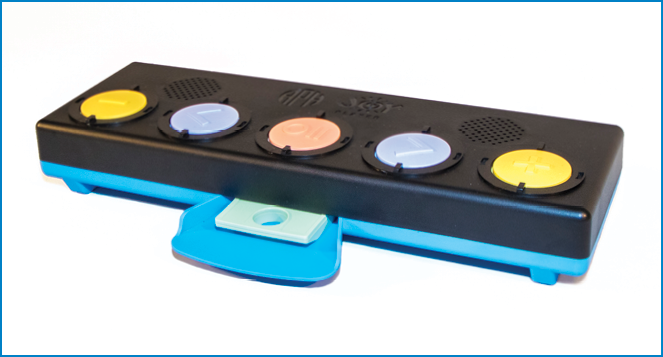
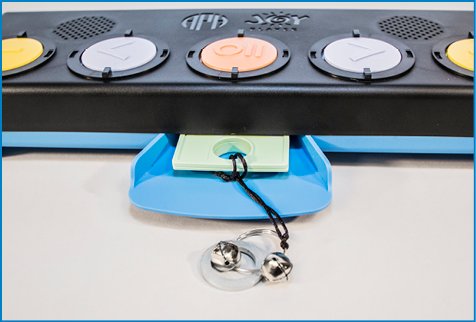
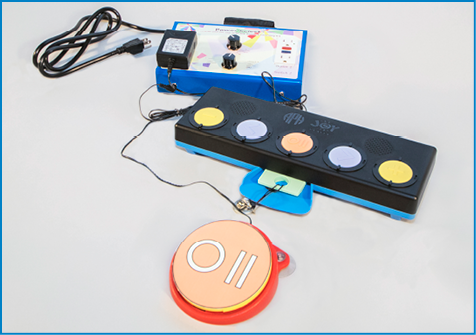
The front view of the player shows a chute that is designed to accept a Digital Talking Book (DTB) Cartridge. The player should be positioned so the chute is directly in front of the student. The top of the player has five button switches to operate the volume (softer and louder), song choice (reverse and forward), and play/pause.
The back of the player has the following features and controls.
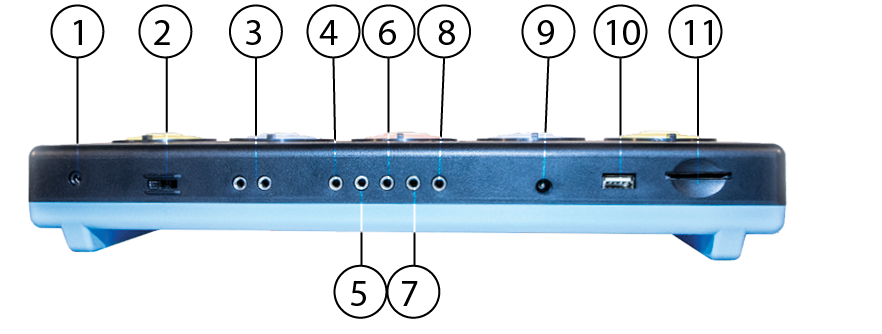
- stereo headphone jack
- main power switch (SLK mode, on/off)
- two sip and puff switch jacks
- volume up jack
- forward jack
- play/pause jack
- reverse jack
- volume down jack
- power/recharger portal
- USB portal
- SD card slot
Portable Electronic Storage Devices
The Joy Player can play audio from three different types of portable electronic storage devices: SD card, USB flash drive, and Digital Talking Book (DTB) Cartridge. The player comes with two blank DTB Cartridges. Simply copy any WAV or MP3 file to an SD card, USB flash drive, or DTB Cartridge. Additional DTB Cartridges are available for sale from APH (#1-02610-00). SD cards and USB flash drives are available in most local stores.
Note: The Joy Player does not play pre-recorded books on DTB Cartridges from the National Library Service (NLS) because NLS uses 3GS files, not WAV or MP3 files.
Most music and audiobooks purchased on CDs or downloaded from the Internet use WAV or MP3 files. Use the USB Extension Cable (included with the product) to transfer music and books from a computer to a blank DTB Cartridge.
Always load the DTB Cartridge into the player via the chute. The chute is designed to help students with limited hand use guide the cartridge into the player. The cartridge must be pressed firmly to the end of the chute to make the USB connection. The student may need assistance. The DTB Cartridge will not insert into the USB portal on the back of the player; this portal is for a USB flash drive.
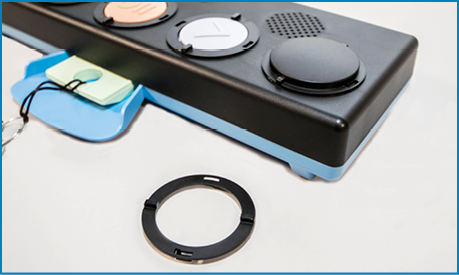
Twist-on Caps
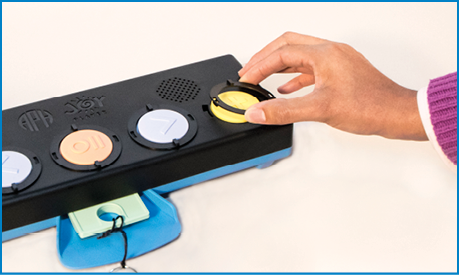
The product has twist-on caps (with accompanying rings) to reduce the number of button switches on the device temporarily; this reduces visual and cognitive complexity. To use a twist-on cap, you must first remove the ring at the base of a button switch. Grasp the ring, twist, and lift. There are slots around the base of each button switch. Position the tabs of the black cap over the slots, insert, and twist to lock in position. To remove a black cap, twist and lift. Always replace the ring at the base of the button switch to cover up the slots: This prevents dust and debris from getting into the circuitry of the player.
Modes of Operation
The product features multiple modes of operation to accommodate a diverse range of cognitive and physical abilities and environmental settings.
Button switch operation with DC (batteries)
External switch operation with DC
Features
Button Switches
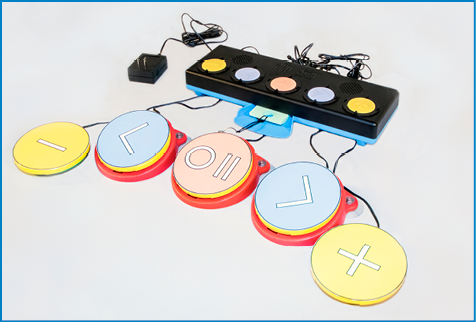
The Joy Player features five button switches that operate—from left to right—the following tasks:
- decrease volume
- back to the previous song (reverse)
- play/pause
- advance to the next song (fast-forward)
- increase volume
The button switches are identified by pastel colors (red for play/pause, purple for previous and next song, and yellow for volume control) and tactile markings (a circle next to a vertical line for play/pause, directional arrows for previous and next song, and plus and minus signs for volume control).
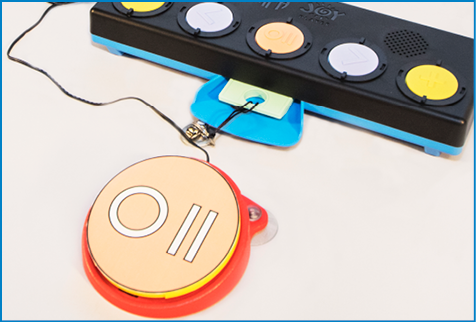
External Switches
Direct switch use.
The back of The Joy Player has jacks to accept external switches. As many as five switches can be added—one each to provide the function of each button switch. External switches operate whether the player is using AC or DC.
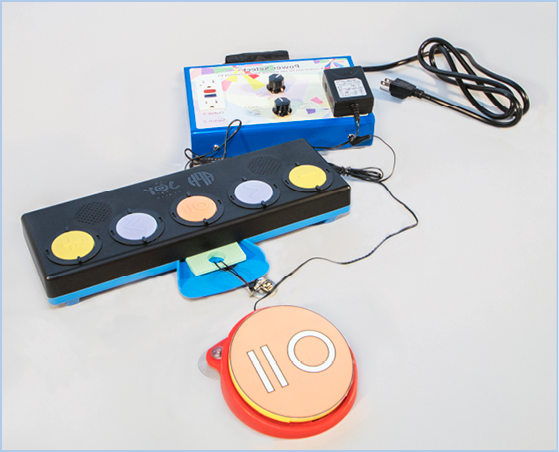
SLK mode.
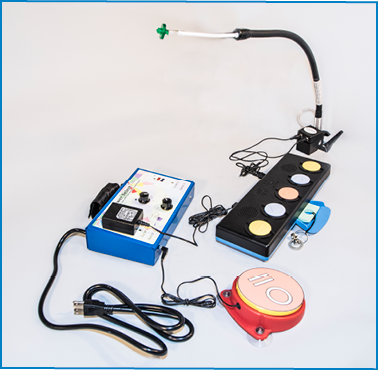
To operate The Joy Player with the SLK Power Select, push the main power switch on the back of the player to the SLK mode position. Plug The Joy Player recharger (12v) into the back of the player and then into one of the outlet receptacles of the Power Select. Insert an external switch (e.g., pad switch, stick switch, sip and puff switch, etc.) into the corresponding switch jack on the Power Select. In the SLK mode, the student may play and pause the audio; he will not be able to control song choice or volume. To allow a student full control of The Joy Player, refer to External Switches Direct switch use. The SLK mode requires the player to use AC.
Sip and puff switch.
A sip and puff switch is used two ways with The Joy Player. When in SLK mode, plug a sip and puff switch into the two designated sip and puff jacks on the back of the player. It will operate with AC or DC. If you wish to use a sip and puff switch with a power control unit for a designated amount of time, set up The Joy Player as described under SLK mode with one external plate-type switch and the timer mode on the power control unit. Then, plug the sip and puff switch into the two sip and puff jacks. First, press the external plate switch; this turns on the music. Next, pause the music using the play/pause button on the player (or using the sip and puff switch). It is ready for the student to begin playing music.
Students, who want the external switches to match the button switches on the player, can cut out and use the artwork in this booklet. To make more copies of the artwork, download a version of this booklet online: www.aph.org/manuals. The Joy Player has a headphone jack that accepts a standard 3.5 mm plug.
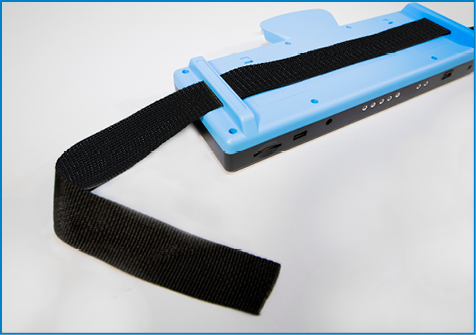
Hook and Loop Strap
The Joy Player comes with a 65" strap to secure the player to the wheelchair tray. Thread the strap through the buckle loops on the back of the player. Wrap the two ends of the strap under the tray or around a secure part of the wheelchair and press the hook side of the strap to the loop side. This prevents the player from accidentally falling off the tray or prevents a student throwing it off the tray.
Batteries
The Joy Player comes with six AA metal hydride batteries. Metal hydride batteries are rechargeable. The player will operate using alkaline batteries, but alkaline batteries are not rechargeable. Prior to using the player for the first time with DC, APH recommends that you charge it between 16 and 20 hours.
To do this, plug the recharger into the power receptacle on the back of the player and then plug the other end of the recharger into the wall outlet. The slide switch on the back of the player must be in the "on" or "off" position to charge; it will not charge in the SLK mode. When you first get your player, you may operate it immediately using AC.
Note: High volume use decreases battery charge. The batteries last longer when the volume is played at a lower setting. Batteries charged overnight and used at moderate volume should last approximately 8-10 hours.
Troubleshooting
Question: When the player is in "Pause" and the student presses any other button switch, the button switch that is pressed activates. Why is that?
Answer: The player is designed (like a cassette player) to act upon any given command unless the power to the player is turned off with the slide switch on the back of the unit.
Question: The music starts immediately after the student loads the cartridge, without pressing "Play." How can I stop that from happening?
Answer: If you insert a cartridge when the player is turned on, it begins to play. This circuitry feature enables The Joy Player to function with a power control unit and external switch (SLK mode). Power control units stop and start power applied to the player. If a listener activates a switch, it disconnects power and the player stops. When the switch is activated again, it applies power and the unit plays. If you are not using a power control unit with a switch and wish to "work around" this feature, turn the power off (slide switch on back of unit). Once the student slides the cartridge in, turn the power back on, and instruct the student to press "Play." If the student delays too long in pressing the play/pause button, the player will begin playing automatically. Should that happen, press play/pause to stop the music and then the student can begin again.
Customer Service
Each player has a serial number on the bottom. Do not remove this number; you may need it if you call customer service. If you are experiencing trouble with an APH product, please call our customer service staff at 800-223-1839.
Limited Warranty
The Joy Player is covered by a warranty that expires 1 year from the date the player is shipped to the end user. Warranty does not apply in cases of customer modification, misuse, or abuse of APH products.
External Switch Art
To label external switches to match the button switches on the player, cut out and use the artwork in this booklet. For additional copies, print a PDF of the Joy Player Switch Art.
.png)
.png)
.png)
Sensory Learning Kit and Routines
The American Printing House for the Blind (APH) recommends that teachers and parents read the SLK Guidebook and SLK Routines Book prior to implementing the Personal Music Player Routine. Completion of the SLK assessment tools will help determine at which level the routine needs to be implemented to meet the needs of the learner. Each level is designed to build upon the interaction abilities present at the preceding level.
The following information was published originally in the SLK Routines Book as part of the Sensory Learning Kit (SLK) (2005). Language in the original publication accommodated cassette players and CD players. The adaptation presented here accommodates The Joy Player and has been reviewed and approved by the original author, Millie Smith.
Intervention Levels
The routines contained in the Sensory Learning Kit (SLK) are organized into three levels:
- First: Quiet Alert (Attention)
- Second: Active Alert (Exploration)
- Third: Partial Participation (Function)
Goals
Skills in the areas of communication, cognition, and motor functioning are highly related to quality of life. Routines give learners opportunities to acquire and maintain these skills in appropriate contexts throughout their lives. More in-depth information on skills in the areas of communication, cognition, and motor functioning are outlined in the SLK Routines Book.
Quiet Alert Routines
- Help the learner establish and maintain alertness.
- Help the learner establish a positive relationship with partners who respond to her expressions of pleasure and displeasure.
- Help the learner anticipate a predictable event associated with a specific location, position, and object.
Active Alert Routines
- Help the learner develop intentional, exploration behaviors as he attempts to interact with media and partners.
- Help the learner anticipate a predictable event associated with a specific object presented in a communication context such as a calendar, schedule, or choice board.
- Help the learner expand his repertoire of interactions by encouraging imitation of actions initiated by the partner.
Partial Participation Routines
- Help the learner anticipate the next step in a sequence of steps leading to a meaningful outcome.
- Help the learner take responsibility for doing everything she can do in each step.
- Help the learner use people and devices as aids for completing parts of steps beyond her abilities.
General Strategies
The learner's team should address specific strategies at each level before routines are implemented. Certain general strategies are typical at each level.
Quiet Alert Level (Attention)
- Only use items from the learner's appetite list.
- Present appetite items in routine formats to avoid startle responses and build experience memory.
- Know the learner's distress signals and plan appropriate responses.
- Know the learner's seizure history. Avoid stimuli that might provoke a seizure.
- Make sure that the learner is positioned and supported for maximum comfort and flexibility.
- Keep careful records of medication changes, seizure activity, hydration, elimination, sleep, and other factors that may influence responses.
Active Alert Level (Exploration)
- Know the learner's voluntary movement abilities and orthopedic limitations. Provide positioning and support that maximizes the learner's ability to interact with stimuli.
- Recognize the learner's cognitive intent. If movement is severely restricted, the extension of any part of the body may signal intent to reach, explore, or manipulate.
- Partners must be prepared to facilitate movement to complete the learner's intention. Success will usually be indicated by the learner's continued orientation to the stimulus and by his pleasure in the interaction.
- Use a hand-under-hand technique to model new interactions with objects whenever possible. Avoid manipulating the learner's hands.
- Allow oral exploration of stimuli. Learners who have the motor ability to explore with their hands will begin to do so after an initial period of oral exploration if they have a rich variety of objects to explore. Oral self-stimulation tends to occur when learners do not have access to opportunities to engage in more developmentally interesting kinds of stimulation. Oral exploration should never be discouraged for learners who do not have the motor capability of exploring objects with their hands. Quality tactual information is obtained best by the hands, feet, lips, and tongue. If use of some of these highly effective sensory areas is limited, the others must be used.
Partial Expectation Level (Function)
- Pace routines so that the learner has the opportunity to do everything he can do on each step of the routine as independently as possible.
- Wait for the learner to signal his intent when he can no longer perform independently.
- Use accommodations that allow the learner to participate at the highest possible level. Assess the sensory qualities of the environments in which routines naturally occur. Adapt the environment if there are sensory qualities that interfere with the learner's ability to maintain alertness.
Routine Worksheet/Lesson Plan
Learner:
Routine Name:
Starting date:
Ending date:
Documentation date:
Routine Location:
Object Cue:
Partner to teach:
Time:
Level:
Context:
Materials:
Target IEP skills:
- Documentation is required only on those steps related to an IEP goal.
- Not all Learner's Steps target IEP goals.
Learner:
The Routine Worksheet/Lesson Plan, excerpted below, has five columns with the heads, Learner, Modifications, Goal Number, and Documentation. Optionally, download the Routine Worksheet/Lesson Plan as a Microsoft Word document.
| Lerner's Steps | Modifications | IEP Goal Number | Documentation |
Switch Introduction
The switch introduction (SI) icon has been added to specific steps of routines where switches may enhance performance. Learners should be familiar with the item being used in a routine prior to switch introduction.
Quiet Alert Level (Attention)
Partners can activate battery-operated toys and other items to elicit orienting responses.
Active Alert Level (Exploration)
Generally, switches should be introduced at the Active Alert Level with the intent to facilitate the learner's manipulation of an item (music player). The relationships between the switch and the object or item it activates should be very obvious. Initially, use one item and one switch and place them as close together as possible.
Partial Participation Level (Function)
Place the switch as close as possible to the item so that the learner can see or feel both the switch and the item during activation. When causality is well established, switches may be placed farther from the item and more than one switch and item may be used.
Personal Music Player Routines
Appetite Item: The Joy Player (or other accessible player)
Typical Primary Sensory Channel: Auditory
Quiet Alert Routine (Attention)
- Learner Step: Experience music as provided by partner.
Accommodations and supports: Partner greets learner and facilitates learner's experience of music. Partner is careful to present music in appropriate manner to minimize startle or avoidant reaction.
Goal: Learner anticipates transition to activity area after presentation of music.
Step 1 introduces (plays) music. - Learner Step: Go to activity area.
Accommodations and supports: Partner transitions learner to specific area where activity is to take place. Give learner time to orient to new location.
Goal: Learner anticipates familiar activity given location cues. - Learner Step: Get in best position for activity.
Accommodations and supports: Partner positions learner using techniques and strategies prescribed and modeled by physical therapist (PT) and occupational therapist (OT) to ensure access to best sensory and motor abilities.
Goal: Learner anticipates familiar activity given location and position cues. - Learner Step: Experience music with partner again.
Accommodations and supports: Partner plays music in such a way that learner's attention is drawn to music source. Use information from the SLK Sensory Learning Summary (in the SLK Guidebook) to determine optimum range, position, and volume for visual and auditory attention.
Goal: Learner orients to music player as music is played. - Learner Step: Reorient to music and/or player after pause.
Accommodations and supports: Partner continues music until attention is lost, and then pauses to wait for learner to notice music has stopped. Partner reintroduces player and music at various points (right side, left side, behind, in front, above, and below) and distances (less than three feet, between three and six feet, and beyond six feet).
Goal: Learner extends duration and variety of attention responses. - Learner Step: Put player away.
Accommodations and supports: Partner helps learner put player away using hand-under-hand support.
Goal: Learner anticipates transition to next activity.
Active Alert Routine (Exploration)
- Learner Step: Take player from anticipation calendar (now container).
Accommodations and supports: Partner presents familiar container with player and uses hand-under-hand technique to facilitate experience of player in best sensory channels.
Goal: Learner anticipates activity associated with object.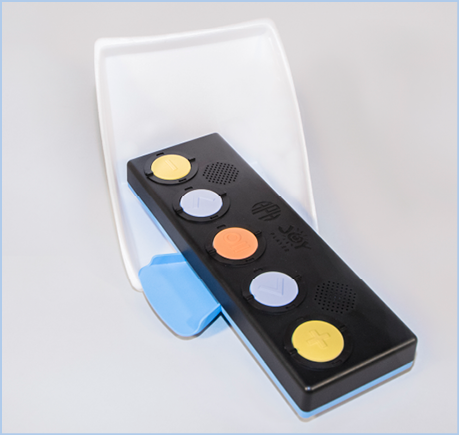
Step 1 presents The Joy Player in the anticipation calendar to the learner. - Learner Step: Go to appropriate area.
Accommodations and supports: Partner transitions learner to specific area where activity is to take place. Give learner time to orient to new location.
Goal: Learner assists in transition by imitating (visually and/or tactually) the actions modeled by partner. - Learner Step: Get in best position for activity.
Accommodations and supports: Partner positions learner using techniques and strategies prescribed and modeled by PTs and OTs to ensure access to best sensory and motor abilities.
Goal: Learner visually and/or tactually searches for familiar item used for support in the place where it is usually located. - Learner Step: Explore player while music is playing.
Accommodations and supports: Partner plays music, and watches for any motor response that might indicate a desire to interact with player. Partner facilitates exploration by helping the learner follow through on any form of exploration initiated by him using hand-under-hand guidance.
Goal: Learner initiates exploration of object using three specified exploration schemes and procedures. - Learner Step: Imitate action on player modeled by partner.

Accommodations and supports: Partner may regulate volume, turn player on and off, and so forth. Watch learner's movements to determine requests for certain actions.
Goal: Learner will use facial expressions, vocalization, or body movement to request start or change. - Learner Step: Turn music player on and off.
Accommodations and supports: Partner uses hand-under-hand guidance to facilitate execution of the action initiated by the learner.
Goal: Learner uses switch to activate device.
Step 6 activates The Joy Player with (or without) a switch. - Learner Step: Put player in finished container.
Accommodations and supports: Partner helps learner put object in familiar container.
Goal: Learner anticipates transition to next activity after object is placed in finished container.
Partial Participation Routine (Function)
- Activity Context
- Younger Students—Music Circle, choice time, rest time
- Older Students—Band Class, break time, during vocational tasks as appropriate
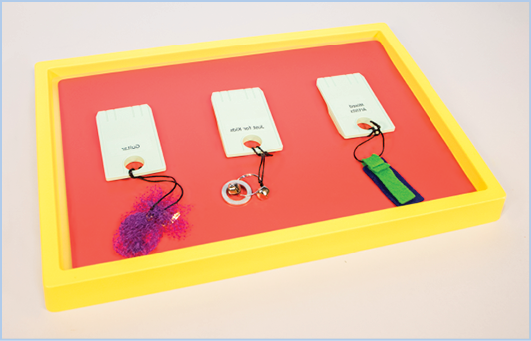
- Learner Step: Take player symbol from calendar box.
Accommodations and supports: Partner uses hand under hand to facilitate obtainment of activity symbol to communicate to learner that the activity is about to begin.
Goal: Learner anticipates beginning of activity associated with object.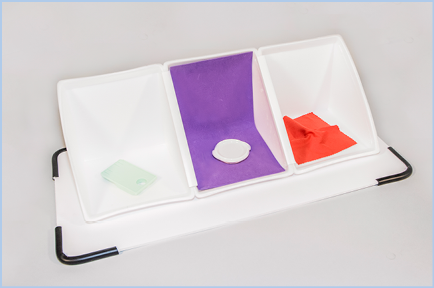
Step 1 presents the DTB Cartridge—in a calendar box—as a symbol for The Joy Player. - Learner Step: Go to activity area.
Accommodations and supports: Partner facilitates transition initiated by learner to specific area where activity is to take place and gives learner time to orient to new location.
Goal: Learner demonstrates knowledge of place associated with an activity by looking at or moving toward a visual feature of the activity area or by looking at or moving to a sound associated with the activity area. - Learner Step: Get in best position for activity.
Accommodations and supports: Partner positions learner using techniques and strategies prescribed and modeled by PTs and OTs that ensure access to best sensory and motor abilities.
Goal: Learner assists during positioning by using eye gaze, vocalizations, and gestures to request help and to request specific items used for positioning. - Learner Step: Get player and desired cartridge.
Accommodations and supports: Partner uses hand-under-hand guidance to facilitate execution of actions initiated by learner to obtain materials and responds to learner's requests for help.
Goal: Learner initiates actions and requests help as needed. - Learner Step: Load cartridge.
Accommodations and supports: Partner uses hand-under-hand guidance to facilitate execution of actions initiated by learner to load cartridge and responds to learner's requests for help.
Goal: Learner initiates actions and requests help as needed. - Learner Step: Play music.
Accommodations and supports: Partner uses hand-under-hand guidance to facilitate execution of actions initiated by learner to play music and responds to learner's requests for help.
Goal: Learner initiates actions and requests help as needed. - Learner Step: Put materials away.
Accommodations and supports: Partner uses hand-under-hand guidance to facilitate execution of actions initiated by learner to put materials away and responds to learner's requests for help.
Goal: Learner initiates actions and requests help as needed. - Learner Step: Put player symbol in finished box.
Accommodations and supports: Partner uses hand-under-hand guidance to facilitate execution of actions initiated by learner and responds to learner's requests for help.
Goal: Learner initiates actions and requests help as needed. - Learner Step: Find next activity symbol in calendar.
Accommodations and supports: Partner uses hand-under-hand guidance to facilitate obtainment of symbol.
Goal: Learner anticipates beginning of activity associated with object.
Expansion Learner Steps
- Choose desired music from an array.
- Learn to forward and reverse to locate favorite songs.
- Play requests for peers.
- Learn to place cartridges in storage container.
- Label cartridges.
- Organize cartridges.