Acknowledgements
Special thanks to the following professionals who contributed their time and expertise to the evaluation of Tactile Connections: Symbols for Communication:
Kathy Bannan
Teacher of Special Education and Vision
Overbrook School for the Blind
Philadelphia, PA
Ineatha Brice
Special Educator/Teacher of the Visually Impaired
Overbrook School for the Blind
Philadelphia, PA
Beth Cohen
Speech-Language Pathologist
Maryland School for the Blind
Baltimore, MD
Andrea Hausz
Speech-Language Pathologist
Home of the Innocents
Louisville, KY
Margie Goldware
Speech-Language Pathologist
California School for the Blind
Fremont, CA
Elizabeth Hartmann
Teacher Specialist
California School for the Blind
Fremont, CA
Michelle Kornberg
Speech-Language Pathologist
Guild for the Blind
New York, NY
Mary E. McFarland
Teacher
Ozark Hills SSSH #61, DESE
Salem, MO
Robert McLendon
Teacher of the Visually Impaired
Helen Keller School of Alabama
Talladega, AL
Diane Mitchell
Vision Specialist
Willamette Education Service District
Salem, OR
Dave Seyfert
Teacher of the Visually Impaired/O&M Instructor
South County School District
Patchogue, NY
Elizabeth Torrey
Speech-Language Pathologist
Perkins School for the Blind
Watertown, MA
Laurie Wilde
Teacher
Overbrook School for the Blind
Philadelphia, PA
Vicki Wollzyk
Speech-Language Pathologist
Tennessee School for the Blind
Nashville, TN
Special thanks for the guidance provided by members of the Tactile Symbols Planning Committee and the Multiple Disabilities Focus Group.
Tactile Connections: Symbols for Communication was produced through the special talents of many individuals at APH who performed necessary tasks to produce and package the kit. Thanks to those who helped with graphic design, die-cutting, collating, braille translation, CD preparation, printing, purchasing, and support services.
Preface
In April 2000, Karen Poppe, APH Tactile Graphics Project Leader, served as facilitator of the Tactile Symbol Planning Meeting attended by Kay Jahnel (Iowa Braille School), Joan Pease (Iowa Braille School), Kim Conlin (Texas School for the Blind and Visually Impaired), Beth Cohen (Maryland School for the Blind), and Jacey Shumaker (Perkins School for the Blind). The purpose of the meeting was: 1) to review and compare each school's approach to using tactile symbols; 2)to discuss the desired product outcome; 3) to discuss wider applications relative to IntelliTools® adaptations; and 4) to discuss how APH can facilitate the production of a standardized product. Each symbol system was reviewed with regard to categories (e.g., food, emotions, scheduling), symbol structure/design, selection process, appropriate target populations, implementation methods/activities, concrete versus abstract representations, and strengths and limitations. The committee defined appropriate target populations as students who are blind and visually impaired, who have multiple disabilities, who are nonverbal or lack a formal language system, but who have acquired intentional and purposeful methods of communication.
In May 2000, Karen Poppe received support from APH's Product Review Committee to develop a standardized set of tactile symbols. The components planned included: 1) colorcoded, durable mounting boards with hook and loop attachments; 2) adhesive braille and large print labels; 3) actual symbols (if safe and readily available); 4) a guidebook explaining the philosophy and implementation/methods/ strategies of the tactile symbol system, as well as a pictorial library with assembly instructions for the symbols.
In March 2001, the Tactile Symbol Communication System product idea was presented to the Multiple Disabilities Focus Group, a meeting facilitated by Tristan Pierce, APH's Multiple Disabilities Project Leader. Although the members of the focus group fully supported the development of this product, they encouraged a redirection toward creating a system that is not standardized, but one that could be personalized for each individual child.
Tactile Connections: Symbols for Communication is the result of a collaboration of APH project staff and assistance from two of the original members of the Tactile Symbol Planning Committee.
Introduction
Tactile Connections: Symbols for Communication is a comprehensive set of tactile symbols appropriate for use by visually impaired and blind learners lacking formal means of communication or literacy.
All persons, regardless of their individual abilities, should be allowed to communicate their personal needs in an appropriate way, and expect a response. Communication is a basic skill allowing people to manage their lives and maintain their independence.
What are tactile symbols?
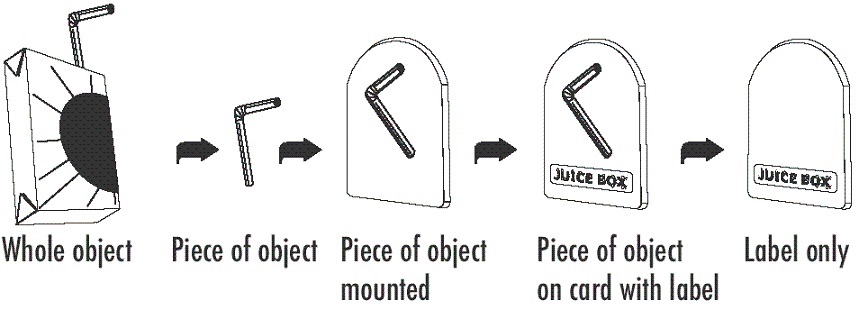
Tactile symbols are graphic forms of communication, created when part of an object is mounted on a portable, hand-sized piece of background material. Thus, they are tactile representations of people, places, actions, and objects that are meaningful to the learner. The nature of the symbol will change from iconic (concrete) to abstract and arbitrary as the student increases her understanding of symbolic representation.
Tactile symbols are tools for teaching important communication and functional literacy skills; they are not specific learning goals. A learner's Individualized Educational Program (IEP) should focus on acquiring skills such as choice-making, organizing language, and increased independence. Tactile symbols are a modification or a type of assistive technology used to help the learner acquire these skills. An example of an IEP goal for which tactile symbols could be used is the following:
Aaron will independently transition from one class to another by traveling a simple route. Criteria for success: 4 of 5 charted trials
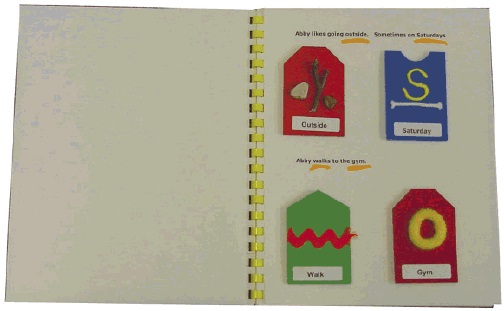
When the tone sounds for the change of classes, the tactile symbols can be used in the learner's calendar to give him information about where he needs to go.
Top: Calendar strip showing a day's activities
|
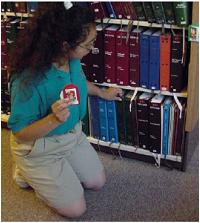
Tactile symbols are also used as location markers at the destination so that the student will know he has arrived at the correct place. |
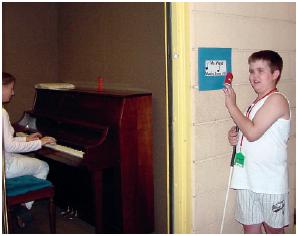 At left: Student arriving at music class At left: Student arriving at music class |
|
Target Population
| The symbols are designed for individuals who are blind or visually impaired and need an augmentative communication system or need a functional literacy medium. The individual may be communicating intentionally, with the expectation that a communication partner will respond. This communication could be in the form of object symbols, hand guiding, vocalizations, gestures, aggressive behaviors, words, or signs. Understanding of symbolic representation is another prerequisite skill. Whenever possible, the symbols are iconic (e.g., brush teeth is represented by part of a toothbrush). Nevertheless, many of the symbols are arbitrary and require the individual to attach meaning to an abstract representation (e.g., Dad is represented by a piece of leather). |
 |
Two groups of individuals for whom tactile symbols have been successful are those in the early stages of communication and literacy and those with visual and multiple impairments who do not have the prerequisite skills to learn braille or print. Tactile symbols can serve the same purposes as pictures.
For example, a parent or teacher could use the symbols to adapt a book for a child who is blind or visually impaired. In a special education classroom, tactile symbols could be used similarly to Mayer-Johnson pictures on communication boards or in calendar systems. |
 |

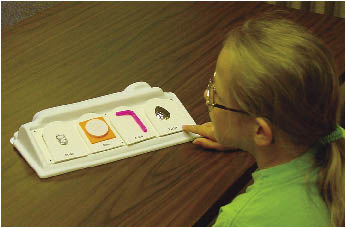
Platform Communicator in combination with tactile cards
|
The authors have used tactile symbols successfully with some individuals who have neurological visual impairments. These individuals might access the symbols visually as well as tactually. An important consideration might also be the auditory learner who has the potential to be a tactual learner. Tactile symbols can be useful tools for teaching tactile skills to the learner who has not previously had an opportunity to develop them within a meaningful context. |
Teaching Strategies
How to Decide if Your Student is Ready for Tactile Symbols
Two prerequisites for tactile symbol use are intentional communication and symbolic representation.
Intentional communication may be in the form of handing an object to the teacher, guiding the hand of the communication partner to a desired toy to play, vocalizations of contentment or disapproval, turning the head, or aggressive behaviors. Any of these acts are done by the learner with the expectation of a response from another individual.
With any learner there is a natural progression in the development of language accompanied by the understanding of the symbolic representation of print, braille, sign, or tactile icon.
Hierarchy of abstraction for students who use tactile symbols
| Note that a student at the "whole object" stage may be at a presymbolic cognitive level and therefore may not be ready for tactile symbols. The time needed to transition from whole objects to partial objects to symbols (iconic or abstract) will vary greatly from child to child, requiring a couple of weeks to a full year or more. |
The emergent learner experiences the whole object within the meaningful context of an activity or a routine (e.g., choosing a preferred drink). When the learner understands that the object represents an activity, the object can gradually be reduced to a part of the whole object, which continues to be used within the context of an activity or routine. Eventually this object part can be mounted on a background. A tactile symbol is labeled with an even more abstract form of graphic language, large print, and braille. This is done to ease communication with a partner that might not be familiar with the tactile symbols, but also to expose the learner using the tactile symbols to the braille or print representation. Eventually, the learner may progress to the point where only the most abstract level of symbolic representation, the print or braille word, is presented. Allowing the learner to progress through these stages of developing symbolic language is important to the learner's success in using tactile symbols for receptive and expressive communication. |
Presenting Tactile Symbols
| The manner in which the tactile symbols are presented to the learner is important to the success of developing and understanding symbolic language. To encourage language and communication skills we often model language while the learner is handling an object. In this way the learner receives information through the kinesthetic, olfactory, visual, tactual, and auditory channels. What is being experienced firsthand is named or labeled, thus attaching meaning to the abstract spoken language symbol. Key to making this connection to the symbolic representation, whether spoken word, printed word, braille, sign, or tactile symbol is a consistent presentation of that symbol within a meaningful context. For example, the tactile symbol for bathroom will best be learned and generalized if it is consistently presented as the learner is taken to the bathroom, or if the learner touches the tactile symbol for book/reading every time she goes to the shelf where books are kept. |

Learner touching bathroom sign
and card simultaneously
Learner exploring books
in library setting |
Additionally, using the same strategies of overlapping the experience/verbal language/ symbol in all settings in which the learner functions on a daily basis will enhance the learner's perception of this symbolic system as a valuable and effective way to communicate and meet personal needs.
For some low vision learners the presentation of the symbols on high contrast background can bring their visual focus to the symbol even though they will tactually explore the symbol for detail. Other materials that are helpful for presenting tactile symbols include the following:
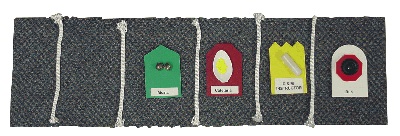
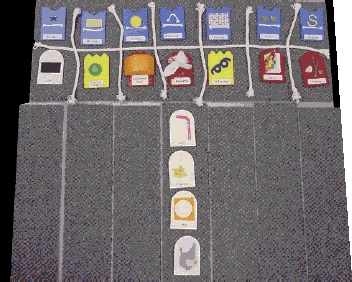
a) headliner fabric, which is hook and loop sensitive, makes a great mounting surface to store symbols on a wall; use rope to divide categories;
b) indoor/outdoor carpet (e.g., Berber) which can serve as a schedule or sequence strip at the table;
c) a fanny pack for portable storage for the student who needs to take symbols along as a transition is made from one activity to another; and
d) a personal planner or small binder to allow the older more mobile learner to plan and refer to a daily schedule.
The manner in which symbols are presented can also teach pre-literacy skills, such as identifying the top and the bottom of a book, moving left to right, tracking across a line, moving to the next line, and recognizing the end of text on a page. For example, a schedule board would be read beginning at the top and progressing left to right or top to bottom. A similar tactile schedule for an older learner might be in the form of a personal planner that has a page for the morning schedule and a second page for the afternoon schedule. This format can be useful in teaching the student all of the aforementioned pre-literacy skills.
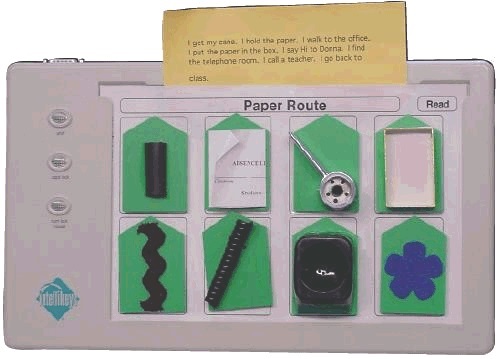
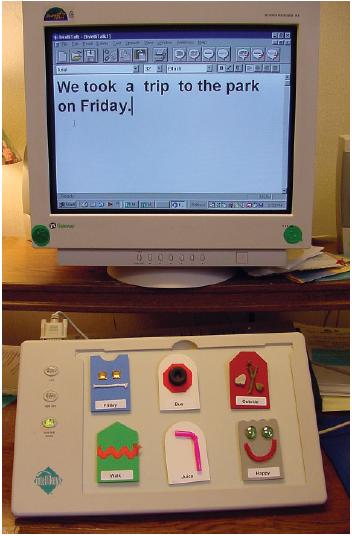
Another example of a way to teach pre-literacy skills is a storybook that has been tactually adapted by the use of a tactile symbol affixed to a page to represent the main idea. As the learner participates in reading the adapted book with a partner, several skills are used, such as identifying the top of the page, locating the symbol on the page, and turning to the next page at the appropriate time in the story. A more complex version of a tactually adapted story is an IntelliKeys® overlay or something similar that presents one or two rows of tactile symbols in sequence to tell the story. As the learner hears the story, he is able to associate the main idea with the tactile symbol presented on the overlay. An auditory signal will prompt the student to scan in a left-to-right, first-to-second line progression to hear the story in its entirety.
IntelliKeys story overlay:
Learner's Paper Route prepared by California School for the Blind |
 |
When assessing potential use of tactile symbols for a learner with a physical disability and limited motor skills, it is important to allow the learner access to tactually explore the symbols or to improve his visual access. Consider providing access to the tactile symbols by affixing them with hook and loop strips to a lap tray. Another option would be to affix the tactile symbols to a voice output switch that is carefully placed on a lap tray or table within the learner's range of motion. A slant board with hook and loop strips might provide better access to a schedule or storyboard.
Applications
Tactile Symbols as a Communicative Form
| For individuals who have delayed speech and language development, tactile symbols can be used as an alternative form of communication. By handing a tactile symbol to a communication partner or by pressing a tactile symbol attached to a voice output device, a learner can request, reject, make a choice, ask a question, answer a question, report on an experience, or give directions to a peer. The learner who has motor impairments that compromise speech intelligibility could use tactile symbols to make choices by handing them to the communication partner. For example, when presented with a choice of juice or milk, the learner would hand the symbol representing juice (the preferred drink) to the communication partner. A learner with deafblindness could use tactile symbols to communicate with a person who does not sign. Tactile symbols can also be used on many voice output devices (e.g., CheapTalk®) to allow the learner with a visual impairment to access this technology. |
Learner using a CheapTalk to choose a drink |
Tactile Symbols as a Strategy to Teach Communication and Other Related Skills
Expanded calendar for grocery purchases |
Calendar Systems/Time Concepts
A meaningful way to introduce tactile symbols is through calendar conversations. Calendars provide information about a learner's schedule in a clear and consistent format. Tactile symbols provide a concrete referent to support engaging conversation about his personal schedule or experiences, both past and future. A tactile symbol calendar can be easily manipulated to reflect change in routine and will facilitate smoother transitions for some learners. Calendars using tactile symbols are great tools for teaching time concepts such as "now" and "finished," "before" and "after," "morning" and "afternoon," days of the week, months, and holidays. For the more advanced learner, his daily schedule could be recorded in a personal planner. Such a planner would likely go with the individual throughout the day as a referent. |
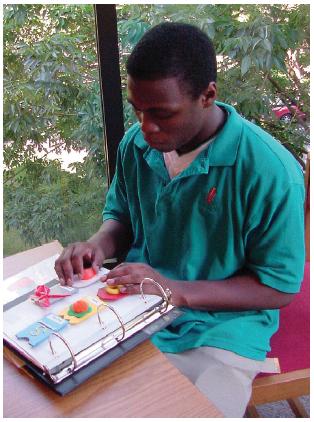
Learner with personal planner in binder. |
Monthly calendar
Cards mounted on the refrigerator |
Independence
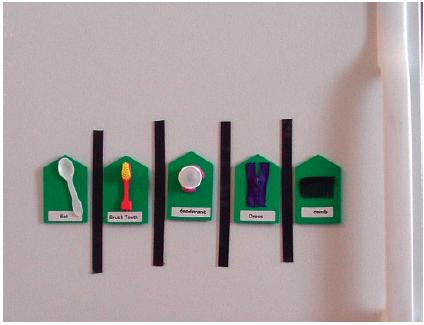
Effective use of a tactile symbol sequence strip can allow the user increased opportunity for independence in transitioning from one step in an activity to another, or making decisions regarding the sequence of steps within an activity. For example, the steps of a morning routine could be sequenced using tactile symbols (e.g., eat, brush teeth, apply deodorant, comb hair, and get dressed). The user can read the steps from left to right to move through the routine with greater independence.
Orientation and Mobility Skills
Tactile location markers can facilitate greater independence in orientation and mobility. The learner can refer to her calendar to get information about where she is going next. She can then carry the tactile symbol representing the destination as a concrete reminder that can be matched to the location marker confirming she is in the correct place. In addition, tactile symbols can be used to make landmarks more obvious for individuals learning new routes.
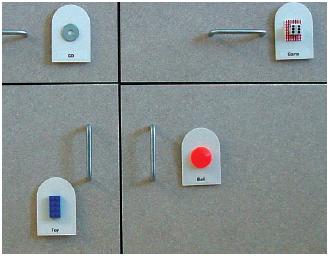
Cards affixed to recreational cabinets |
Personal Organization
Another component of independence is personal organization. Tactile symbols may be used to label personal belongings. For example, cabinets may be labeled with the tactile symbol to indicate recreational items are stored in that location. CD collections can be labeled with tactile symbols to indicate the type of music they contain. |
Sequence cards for telling a story |
Language/Communication Skills
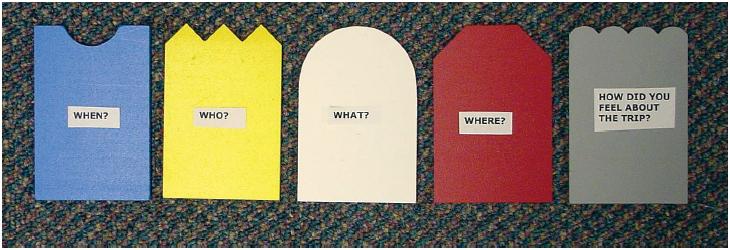
For individuals with receptive and expressive language impairments, tactile symbols can provide the support needed to increase understanding and expression. The symbols can be used as a prompt to help an individual give an organized account of a personal experience. For example, a learner could have tactile symbols representing the important information about his experience (who, what, when, where, why, and how) in a sequence when telling his story to the class.
Learners could also have this information in front of them to assist them in answering questions about the experience. The authors have had success using tactile symbols with students who have echolalia. The tactile symbols may be helpful in teaching the word boundaries within sentences and helping those with echolalia to form new utterances.
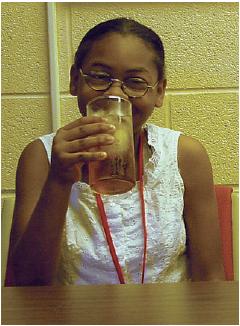
Learner drinks cold tea. |
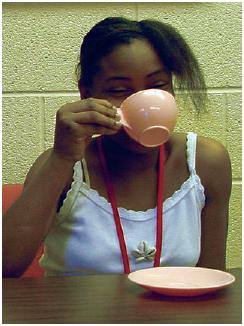
Learner drinks hot tea. |
You can demonstrate how changing one word in a sentence changes the meaning in a concrete way ("Johanna drinks cold tea" vs. "Johanna drinks hot tea").
Tactile Symbols as a Form of Functional Literacy
Experience Stories
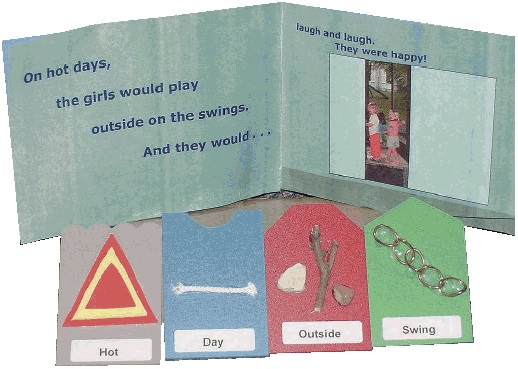
Tactile symbols may become more meaningful symbols of language when extended to a form of functional literacy. The emergent reader may choose and arrange tactile symbols to recount a personal experience or a story. While the text of these experience stories may be refined with the assistance of an adult or peer, the content and sequence of the stories can be dictated by the learner's choice of tactile symbols. For example, the symbols might be presented in random arrangement on a carpet square or board for the individual to sequence. |
Personal experience story |
IntelliTools®
Learners can participate in creating interactive stories using IntelliTools® software. A learning partner can provide a simple IntelliTalk® story template with a 4- 8 key overlay to which the chosen tactile symbols can be attached with hook and loop strips in the order chosen by the learner. As the tactile symbol is selected, the related text would be written on the computer monitor and read with IntelliTalk. |
Interactive story using
IntelliKeys® software |
Social Stories
Social stories, which can be an effective way to shape positive behaviors, can be made accessible and more meaningful using tactile symbols (Gray, 2000). Similar options can be used for creating the social story as were used to create the experience story. Since a social story is generally, but not always, planned and written by an adult, the learner might be involved in choosing the appropriate tactile symbol(s) for each page of the story.
Adapted story book |
Adapted Books
Children's literature can be adapted for a child who is blind or visually impaired using tactile symbols. By placing tactile symbols relevant to the text on each page, the visually impaired child has opportunities to anticipate the text much like a sighted child would access the pictures.
Other
Other examples of functional literacy activities to which tactile symbols can be applied are letters, shopping lists, and recipes. |
 |
Pictorial
Library |
Pictorial Library
Introduction
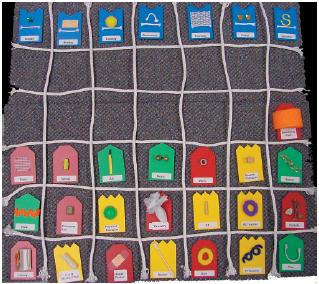
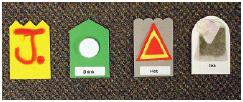
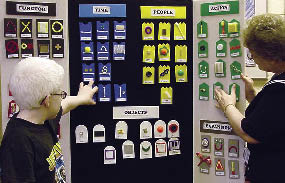
The mounting cards supplied with Tactile Connections: Symbols for Communication provide visual contrast and tactile diversity, both of which are beneficial to the intended audience. Pre-cut from various colors of Sintra®, these cards are very durable. As illustrated in the Pictorial Library in this section, both the color and shape of the mounting cards define each core vocabulary category. Card assignments are as follows:
| Category |
Mounting Card |
| Person |
Yellow "Crown" shape |
| Place |
Red "Barn" shape |
| Action |
Green "House" shape |
| Time |
Blue "Puzzle" shape |
| Object |
White "Bread" shape |
| Expression |
Black "Rectangle" shape |
| Expansion |
Gray "Scalloped" shape |
As you begin to build your library of tactile symbols, always let the learner's needs determine the collection and construction of meaningful symbols, the use of uncontracted vs. contracted braille labels, color selections, material usage, and so forth. Although the individualization of a learner's tactile symbol system is stressed and encouraged, there are some basic guidelines for constructing cards in a manner that ensures both durability and functionality. Before you embark on the actual assembly of the tactile symbols, become acquainted with the following instruction tips:
General Instruction Tips
| |
- The Pictorial Library suggests a tactile symbol for each card, along with step-by- step construction tips. However, keep in mind that the tactile symbol suggested is merely that--a suggestion. The best symbol is one that the learner can bring meaning to and understand its symbolic representation. If at all possible, engage the learner in selecting his own symbols, especially for his own name card and other name (PERSON) cards.
|
 |
- Exercise caution when selecting and using tactile objects for the communication cards. Small items or parts of objects will need to be adhered to the cards. Since adhered items may come off, adult supervision is highly recommended. Attention should be given to choosing Latex®-free materials for those learners who may have allergic reactions to such items (e.g., rubber balloons or rubber gloves).
|
| |
- Facilitate proper orientation of the cards by assigning the straight edge of each card as the bottom of the card and the unique die-cut shape as the top of the card.
|
| |
- Provided with this kit is one tube of adhesive caulking to adhere objects or parts of objects to the cards. Other adhesives can be used depending on the environment. For example, glue dispensed from a hot glue gun may become brittle in extremely cold climates, allowing parts to crack off of the cards. Likewise, certain caulks may remain excessively pliable in extremely hot and humid climates. Choosing the best adhesive for construction purposes may require some experimentation. Keep in mind that while adequate adhesive is important to secure the object to the card, it is equally important not to use too much. Excessive adhesive that oozes over the edges of the object can alter the salient tactile features of the symbol. Periodic inspection of the cards is recommended, continual maintenance of the cards should be expected, and occasional repair is likely. Keep an inventory of objects, scrap materials, donated items, etc., that can be used for future card assembly.
|
| |
- To ensure enough space and proper placement of the objects on the cards, it is recommended that you attach print/braille labels along the lower edge of the cards (see Pictorial Library for examples). It is important to always place the labels in the same position from one card to the next; this consistent placement of the labels facilitates proper orientation of the cards for the learner. Clear adhesive sheets are provided for your braille labeling tasks. To prepare print labels either write directly on the label with a high-contrast marker or pen, or electronically prepare master label sheets with all core vocabulary and then photocopy onto the provided adhesive-backed white label sheets.
|
| |
- After building the cards, use the provided hook (rough) hook and loop tabs to finish the construction. The hook (rough) hook and loop tabs should be placed in the center on the back of the cards. The hook (rough) hook and loop tabs allows multi-placement of the cards from calendar boxes to carpet strips, tactile storybooks, and adaptive keyboards. Magnets (although not supplied in the kit) may be utilized for attachment purposes to magnetic boards or refrigerators for home use.
|
Teacher and learner looking at trifold
|
| |
- It is always important to develop a convenient filing and storage system for the tactile symbols. Tactile symbols should be stored in an accessible place in an organized manner to assure that the learner and partner have easy access to them at all times. The cards may be organized by word category or by an individual learner's unique vocabulary.
|
PERSON
|
Bus Driver
Materials:
Small rubber tire approximately 1-inch to 1½-inches from a toy car
Assembly Instructions:
Adhere the rubber tire to the center of the card above the print/braille label.
Tip:
After placing the adhesive on the underside of the tire and adhering it to the card, squeeze more adhesive into the cavity of the tire to hold it more securely in place.
Other Possible Symbols:
Personalize the card if possible.
|
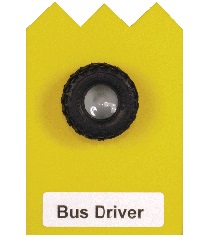
Contracted Braille
bus
driv]
Uncontracted Braille
bus
driver
|
PERSON
|
Dad
Materials:
Small piece of suede/leather, approximately 1-inch square
Assembly Instructions:
Adhere the suede/leather piece to the center of the card above the print/braille label.
Other Possible Symbols:
Personalize the card if possible.
|
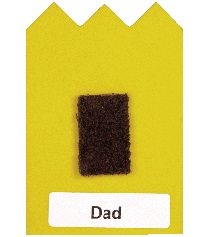
Contracted Braille
,dad
Uncontracted Braille
,dad
|
PERSON
|
Mom
Materials:
Pre-cut or handmade craft foam flower/crazy daisy (approximately 1½-inches wide) in a contrasting color; one 1- inch pompom in a different color (e.g., orange pompom centered on a green flower).
Assembly Instructions:
Adhere the foam flower to the center of the card above the print/braille label. Center and adhere the pompom on top of the foam flower.
Other Possible Symbols:
Personalize the card if possible (e.g., earrings, perfume-sprayed cotton ball, etc.).
|
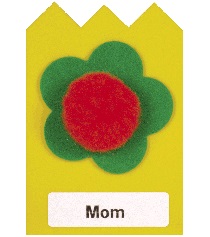
Contracted Braille
,mom
Uncontracted Braille
,mom
|
PERSON
|
Doctor
Materials:
One cotton swab
Assembly Instructions:
Adhere the cotton swab diagonally on the card, avoiding the print/braille label.
Other Possible Symbols:
Personalize the card if possible.
|
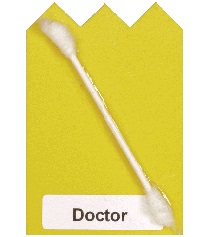
Contracted Braille
doctor
Uncontracted Braille
doctor
|
PERSON
|
O&M Instructor
Materials:
One cane tip
Assembly Instructions:
Adhere cane tip diagonally on the card, avoiding the print/braille label.
Other Possible Symbols:
Cane handle; personalize the card if possible.
|
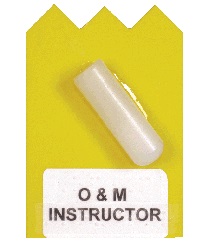
Contracted Braille
;,o & ;,m
i/ructor
Uncontracted Braille
;,o & ;,m
instructor
|
PERSON
|
Occupational Therapist (OT)
Materials:
A wooden dowel approximately 1-inch to 1½-inches long
Assembly Instructions:
Center and adhere the dowel horizontally or vertically on the card above the print/braille label.
Tip:
It might be helpful to paint the dowel in a contrasting color for low vision students.
Other Possible Symbols:
Personalize the card if possible.
|
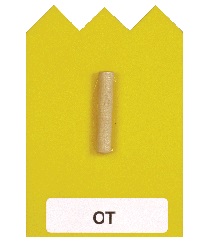
Contracted Braille
,,ot
Uncontracted Braille
,,ot
|
PERSON
|
PE Teacher
Materials:
One small terry cloth elastic for the hair in a bright contrasting color
Assembly Instructions:
Apply adhesive to one side of the elastic band and position in the center of the card above the print/braille label.
Other Possible Symbols:
Personalize the card if possible.
|
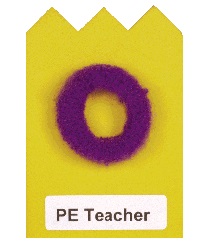
Contracted Braille
,,pe
t1*]
Uncontracted Braille
,,pe
teacher
|
PERSON
|
Physical Therapist
Materials:
Small rubber ball similar to that sold with jumbo jacks. Select a ball of contrasting color.
Assembly Instructions:
Using a matte/utility knife, carefully slice the ball in half. Adhere one half of the ball to the center of the card above the print/braille label.
Tip:
Save the other half of the ball for making another card.
Other Possible Symbols:
Personalize the card if possible.
|
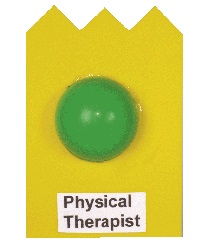
Contracted Braille
physical
!rapi/
Uncontracted Braille
physical
therapist
|
PERSON
|
Speech Therapist
Materials:
A wooden cube approximately one-half inch square that can be obtained from craft stores
Assembly Instructions:
Adhere the cube to the center of the card above the print/braille label.
Tip:
Low vision students may need the cube painted in a contrasting color.
Other Possible Symbols:
Personalize the card if possible.
|
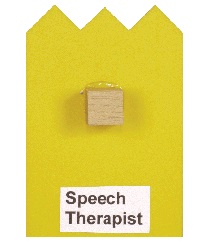
Contracted Braille
spee*
!rapi/
Uncontracted Braille
speech
therapist
|
PERSON
|
VI Teacher
Materials:
One jumbo pipe cleaner of a contrasting color
Assembly Instructions:
Form the pipe cleaner into the shape of eyeglasses. Once formed, trim the two ends of the pipe cleaner leaving about one-half inch on either side to form the ear pieces. Turn the two ends of the pipe cleaner down to avoid sharp edges. Adhere the "glasses" to the center of the card above the print/braille label.
Other Possible Symbols:
Piece of reflective Mylar®; personalize the card if possible.
|
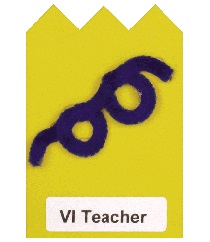
Contracted Braille
,,vi
t1*]
Uncontracted Braille
,,vi
teacher
|
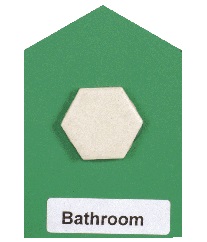
PLACE
|
Bathroom
Materials:
Bathroom floor tile(s), preferably in a contrasting color
Assembly Instructions:
Center the tile above the print/braille label.
Tip:
To ensure tactile diversity, choose tiles that are unique in shape. Many tile vendors/suppliers will give you a few samples.
Other Possible Symbols:
Cardboard tube from toilet paper roll.
|
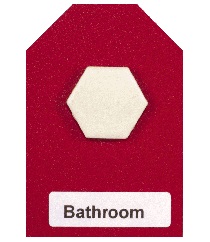
Contracted Braille
ba?room
Uncontracted Braille
bathroom
|
PLACE
|
Cafeteria
Materials:
White plastic spoon; yellow puff paint or dried beans
Assembly Instructions:
Cut spoon just below the bowl and sand any rough edges. Place small yellow dots of puff paint or glue on beans in the bowl of the spoon. After drying is complete, add another layer of puff paint dots or beans. Additional layers may be added until desired height is attained. Position the spoon on the card above the print/braille label.
|
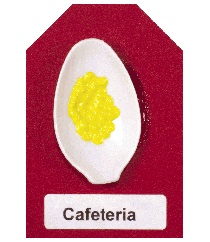
Contracted Braille
cafet]ia
Uncontracted Braille
cafeteria
|
PLACE
|
Community
Materials:
White plastic grocery bag; bread twist tie
Assembly Instructions:
Cut a 4-inch by 4-inch piece from the plastic bag, gather the piece in the middle, and wrap a twist tie around it to form a bow. Apply glue to the back of the twist tie and surrounding plastic area, and secure to the center of the mounting card above the print/braille label.
Tip:
An APH pre-drilled card may be used. Tie the twist tie through the holes.
|
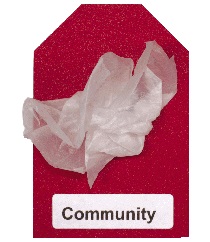
Contracted Braille
-mun;y
Uncontracted Braille
community
|
PLACE
|
Computer Lab
Materials:
One computer keyboard cap
Assembly Instructions:
Fill the inside cavity of the key cap with adhesive, including the edges. Place the key cap in the center of the card above the print/braille label. The print letter on the key cap should be in the upright position.
|
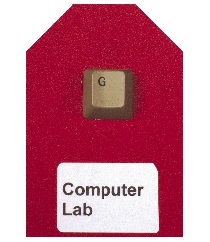
Contracted Braille
-put]
lab
Uncontracted Braille
computer
lab
|
PLACE
|
Dorm
Materials:
Plastic needlepoint canvas
Assembly Instructions:
Cut approximately 1½-inch square piece of needlepoint canvas. Apply a glue drop to each of the four corners. Spread a very thin layer of glue on the center of the card. Place the needlepoint canvas over the thin layer of glue and press so that the four corners bleed through the top, adhering the canvas to the card. The needlepoint canvas should be centered on the card above the print/braille label.
|
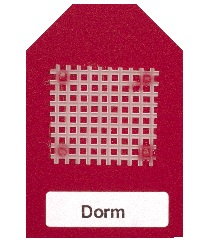
Contracted Braille
dorm
Uncontracted Braille
dorm
|
PLACE
|
Gym
Materials:
One small terry cloth elastic for the hair in a bright contrasting color
Assembly Instructions:
Apply adhesive to one side of the elastic band and position in the center of the card above the print/braille label.
|
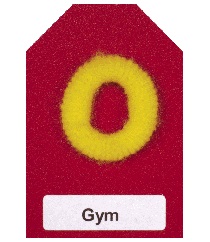
Contracted Braille
gym
Uncontracted Braille
gym
|
PLACE
|
Health Center
Materials:
One small adhesive bandage
Assembly Instructions:
Apply some adhesive to the white gauze part of the adhesive bandage and peel away the protective strips on each side. Place the adhesive bandage diagonally, fitting as much as possible on the card without covering up the print/braille label.
Tip:
The adhesive bandage may need to be trimmed before applying.
|
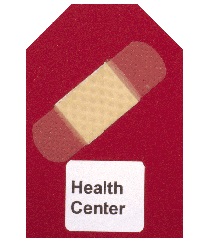
Contracted Braille
h1l?
c5t]
Uncontracted Braille
health
center
|
PLACE
|
Home
Materials:
One house key
Assembly Instructions:
Apply adhesive to one side of the key and place it in the center of the card above the print/braille label.
|
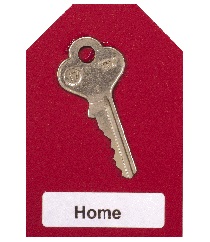
Contracted Braille
home
Uncontracted Braille
home
|
PLACE
|
Library
Materials:
Colorful piece of heavy stock paper to be used as cover of miniature book (approximately 3-inches by 2-inches); five pieces of white copy paper cut slightly smaller; clear packing tape; stapler
Assembly Instructions:
Cover the heavy stock paper with clear tape. Fold each piece of paper in half and stack them together. Staple along centerfold. Adhere the back cover of the miniature book to the mounting card above the print/braille label.
Tip:
Greeting cards can be recycled to achieve or create the colorful front cover. For simpler construction, omit inner text pages of book.
|
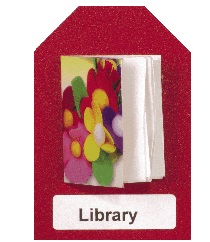
Contracted Braille
libr>y
Uncontracted Braille
library
|
PLACE
|
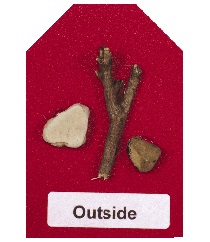
Outside
Materials:
Small rocks and twigs
Assembly Instructions:
Glue rocks and twigs to the center of the card above the print/braille label.
|
Contracted Braille
\tside
Uncontracted Braille
outside
|
PLACE
|
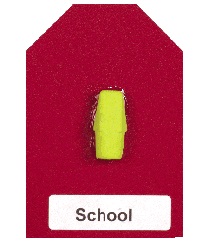
School
Materials:
One traditional pencil-top eraser in a contrasting color
Assembly Instructions:
Adhere the eraser to the center of the mounting card above the print/braille label.
Other Possible Symbols:
Eraser tip cut from end of a pencil
|
Contracted Braille
s*ool
Uncontracted Braille
school
|
PLACE
|
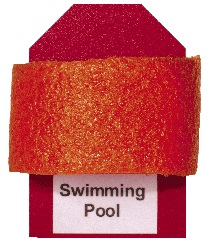
Swimming Pool
Materials:
Piece of swimming pool noodle in a contrasting color
Assembly Instructions:
Cut cross-section of swimming pool noodle and glue to the center of the card above the print/braille label.
Other Possible Symbols:
Portion of swimming diaper
|
Contracted Braille
swimm+
pool
Uncontracted Braille
swimming
pool
|
PLACE
|
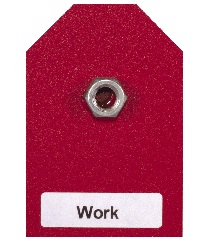
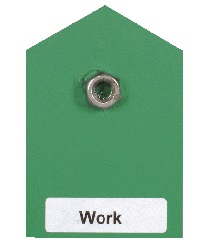
Work
Materials:
Hexagonal metal nut approximately one-half inch in diameter
Assembly Instructions:
Adhere the nut to the center of mounting card above the print/braille label. Apply an extra amount of adhesive inside the hole of the nut.
Other Possible Symbols:
Paperclip
|
Contracted Braille
"w
Uncontracted Braille
work
|
ACTION
|
Art
Materials:
Child's plastic or wooden paintbrush in bright contrasting color.
Assembly Instructions:
Cut paintbrush approximately 2¼-inches long (including bristles). If needed, sand the rough cut edge. Position the cut paintbrush vertically in the center of the card above the print/braille label.
Tip:
If using a wooden paintbrush, consider painting the wooden handle a contrasting color, including the cut edge.
|

Contracted Braille
t
Uncontracted Braille
art
|
ACTION
|
Bathroom
Materials:
Bathroom floor tile(s)
Assembly Instructions
Center the tile above the print/braille label.
Tip:
To ensure tactile diversity, choose tiles that are unique in shape. Many tile vendors/suppliers will give you a few samples.
|
Contracted Braille
ba?room
Uncontracted Braille
bathroom
|
ACTION
|
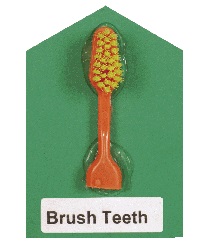
Brush Teeth
Materials:
Child's toothbrush in bright contrasting color. Choose a solid-colored brush.
Assembly Instructions:
Cut the toothbrush approximately 2¼-inches long. If needed, sand the rough edge. Position the cut toothbrush vertically in the center of the card above the print/braille label.
|
Contracted Braille
bru%
tee?
Uncontracted Braille
brush
teeth
|
ACTION
|
Change Diaper
Materials:
Rubber glove
Assembly Instructions:
Cut the finger portion of the glove off, fold cut-edge under, and glue to the center of the card above the print/braille label.
Caution:
Do not use with learners who have Latex allergies.
Other Possible Symbols:
Cut portion of disposable diaper
|
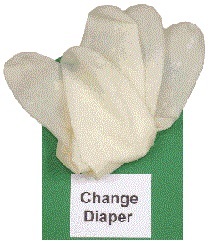
Contracted Braille
*ange
diap]
Uncontracted Braille
change
diaper
|
ACTION
|
Clean
Materials:
One paint sponge in contrasting color
Assembly Instructions:
Cut a 1-inch square piece of a sponge and adhere it to the card, centering it above the print/braille label.
Tip:
Avoid using sponges purchased from the grocery store that contain a solvent that becomes hard over time. Paint sponges remain soft.
|
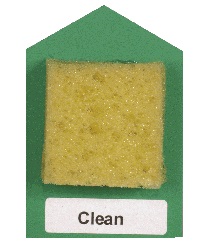
Contracted Braille
cl1n
Uncontracted Braille
clean
|
ACTION
|
Cook
Materials:
Approximately 6 inches of black insulated wire
Assembly Instructions:
Bend the wire into a coiled shape like a stovetop burner. Place adhesive on back of coil. Adhere the coil in the center of the card above the print/braille label.
Tip:
Needle-nose pliers may be helpful in bending the wire into the desired shape. Leave a minimum of ¼-inch between concentric circles, making the coil wide enough for easy tactile recognition.
|
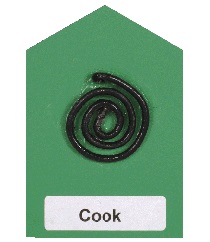
Contracted Braille
cook
Uncontracted Braille
cook
|
ACTION
|
Dress
Materials:
One zipper in a contrasting color
Assembly Instructions:
Cut the zipper to a 2-inch length from the top, retaining the pull tab. Adhere the cut zipper to the card, centering it above the print/braille label.
Tip:
Apply the adhesive only to the fabric part of the zipper, allowing for some functional movement of the pull tab.
|
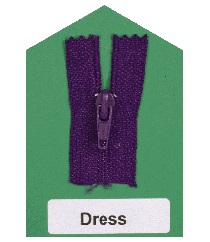
Contracted Braille
dress
Uncontracted Braille
dress
|
ACTION
|
Drink
Materials:
One plastic water bottle cap in contrasting color
Assembly Instructions:
Spread adhesive around the interior sides of the cap, including the edge. Then apply a large amount into the cap. Place the cap in the center of the card above the print/braille label.
|

Contracted Braille
dr9k
Uncontracted Braille
drink
|
ACTION
|
Eat
Materials:
One plastic miniature tasting spoon (from an ice cream shop) or a full-size plastic spoon (cut off close to the bowl of the spoon)
Assembly Instructions:
If using a cut plastic spoon, sand rough edge. Adhere the miniature spoon diagonally in the center of the card above the print/braille label.
|
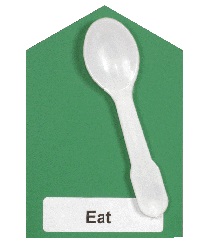
Contracted Braille
eat
Uncontracted Braille
eat
|
ACTION
|
Music
Materials:
Two jingle bells; a piece of strong wire; an APH card with pre-drilled holes
Assembly Instructions:
String the two jingle bells onto the center of the wire. Feed the two ends of the wire through the two drilled holes in the mounting card. Twist the two wire ends on the back of the card and flatten as much as possible for easier application of the hooked hook and loop piece.
Other Possible Symbols:
Toy kazoo; musical greeting card
|
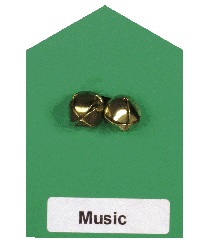
Contracted Braille
music
Uncontracted Braille
music
|
ACTION
|
Play
Materials:
One piece of thin rope or shoelace, approximately one-eighth inch wide
Assembly Instructions:
Cut a 4-inch piece of rope and tie a knot at both ends. Place adhesive along one side of the rope, including good coverage of the two knots. Form the rope in a U-shape (similar to a jump rope) and adhere to the center of the card above the print/braille label.
|
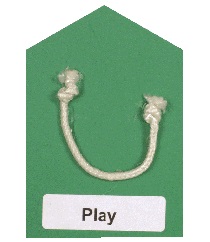
Contracted Braille
play
Uncontracted Braille
play
|
ACTION
|
Read
Materials:
Colorful piece of heavy stock paper to be used as cover of miniature book (approximately 3-inches by 2-inches); five pieces of white copy paper cut slightly smaller; clear packing tape; stapler
Assembly Instructions:
Cover the heavy stock paper with clear tape. Fold each piece of paper in half and stack them together. Staple along centerfold.
Adhere the back cover of the miniature book to the mounting card above the print/braille label.
Tip:
Greeting cards can be recycled to create the colorful front cover. For simpler construction, omit inner text pages of book.
|
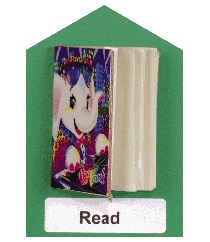
Contracted Braille
r1d
Uncontracted Braille
read
|
ACTION
|
Swing
Materials:
Approximately 2½-inches of decorative chain-like belt purchased at fabric store
Assembly Instructions:
Adhere the chain in the center of the card above the print/braille label.
|
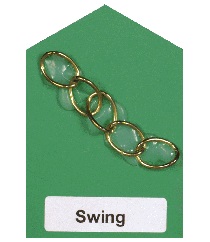
Contracted Braille
sw+
Uncontracted Braille
swing
|
ACTION
|
Walk
Materials:
Approximately 2¼-inches of colorful rick-rack purchased at fabric store
Assembly Instructions:
Center and adhere the rick-rack horizontally across the card above the print/braille label.
|
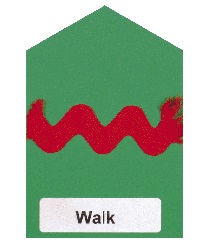
Contracted Braille
walk
Uncontracted Braille
walk
|
ACTION
|
Wash
Materials:
Scrap piece of terry cloth towel approximately 1½-inches square
Assembly Instructions:
Adhere the towel to the center of the mounting card above the print/braille label.
Tip:
The plusher the towel the more tactually distinctive it will be.
|
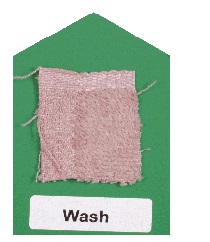
Contracted Braille
wa%
Uncontracted Braille
wash
|
ACTION
|
Work
Materials:
Hexagonal metal nut approximately ½-inch in diameter
Assembly Instructions:
Adhere the nut to the center of the mounting card above the print/braille label. Add an extra amount of adhesive inside the hole of the nut.
Other Possible Symbols:
Paperclip
|
Contracted Braille
"w
Uncontracted Braille
work
|
OBJECT
|
Ball
Materials:
Small rubber ball similar to that sold with jumbo jacks. Select a ball of contrasting color.
Assembly Instructions:
Using a matte/utility knife, carefully slice the ball in half. Adhere one half of the ball to the center of the card above the print/braille label.
Tip:
Save the other half of the ball for making another card.
|
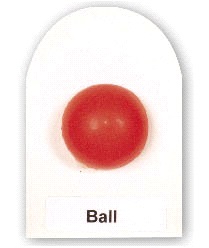
Contracted Braille
ball
Uncontracted Braille
ball
|
OBJECT
|
Bolster Swing
Materials:
Rubber handle or piece of rolled vinyl in a contrasting color
Assembly Instructions:
Glue the handle or the rolled piece of vinyl to the center of the card above the print/braille label.
|
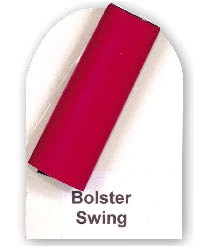
Contracted Braille
bol/]
sw+
Uncontracted Braille
bolster
swing
|
OBJECT
|
Bus
Materials:
Red craft foam (available at craft stores) and a rubber tire (approximately 1-inch to 1½- inches) from a toy car
Assembly Instructions:
Cut the red foam into the shape of a stop sign approximately 1½-inches wide. Adhere it to the center of the card above the print/braille label. Position the rubber tire in the center of the stop sign.
Tip:
After placing the adhesive on the underside of the tire and adhering it to the stop sign, squeeze more adhesive into the cavity of the tire to hold it more securely.
|
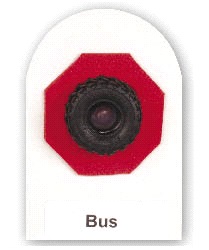
Contracted Braille
bus
Uncontracted Braille
bus
|
OBJECT
|
Car
Materials:
Black nylon webbing used on belts, backpack straps, etc., similar to car seat belt material
Assembly Instructions:
Cut a strip of webbing approximately ½-inch shorter than the width of the mounting card. Adhere the strip to the center of the card above the print/braille label.
|
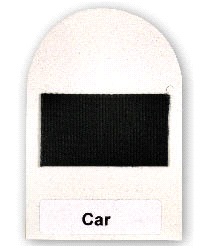
Contracted Braille
c>
Uncontracted Braille
car
|
OBJECT
|
CD
Materials:
A 1-inch flat metal washer
Assembly Instructions:
Adhere the washer to the center of the card above the print/braille label.
|
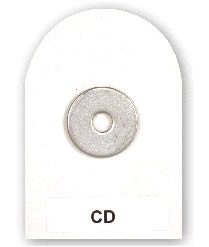
Contracted Braille
;,,cd
Uncontracted Braille
;,,cd
|
OBJECT
|
Computer
Materials:
One computer keyboard cap
Assembly Instructions:
Fill the inside cavity of the key cap with adhesive, including the edges. Place the key cap in the center of the card above the print/braille label. The print letter on the key cap should be in the upright position.
|
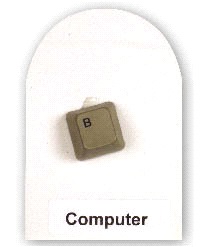
Contracted Braille
-put]
Uncontracted Braille
computer
|
OBJECT
|
Game
Materials:
One piece of craft foam approximately 1-inch to 1½- inches square; one game die or game token
Assembly Instructions:
Adhere the foam piece to the center of the card above the print/braille label. Apply a layer of glue on one side of the die or game token and place it on the center of the foam.
Tip:
Craft stores sometimes have small bags of pre-cut foam shapes in a variety of colors and designs.
|
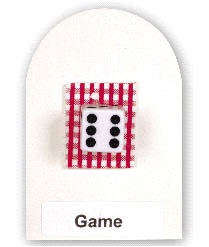
Contracted Braille
game
Uncontracted Braille
game
|
OBJECT
|
Juice
Materials:
One brightly colored drinking straw with an accordion neck
Assembly Instructions:
Cut the straw 1-inch above the accordion and 1½-inches below the accordion. Bend the accordion portion at a 90-degree angle. Apply adhesive to one side and place on the card avoiding the print/braille label.
Tip:
A juice box straw may be an appropriate substitute for the large drinking straw.
|
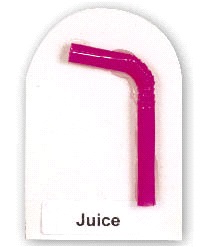
Contracted Braille
juice
Uncontracted Braille
juice
|
OBJECT
|
Milk
Materials:
One plastic pop-off cap from a single-serving milk bottle; one 2-inch square piece of contrasting craft foam
Assembly Instructions:
Apply foam piece in the center of the card above the print/braille label. Fill in the cavity of the milk cap with adhesive and place in the center of the foam.
|
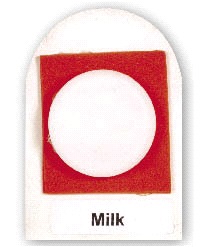
Contracted Braille
milk
Uncontracted Braille
milk
|
OBJECT
|
Music Keyboard
Materials:
Three white plastic spoons; two black spoons; piece of craft foam
Assembly Instructions:
Cut the foam to a 2-inch square and adhere to the center of the card above the print/braille label. Measuring from the ends of the white spoon handles, cut 1½-inch pieces and sand edges if needed. Cut 1-inch pieces from the middle of the black spoon handles and sand edges if necessary. Adhere the three white spoon handles side by side on the foam. Glue the black pieces on top of the white pieces spaced slightly apart to create a piano keyboard.
|
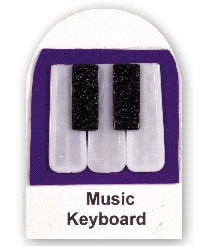
Contracted Braille
music
keybo>d
Uncontracted Braille
music
keyboard
|
OBJECT
|
Popcorn
Materials:
Approximately one dozen kernels of unpopped popcorn
Assembly Instructions:
Squeeze a small amount of adhesive in the center of the mounting card above the print/braille label. Push the kernels down into the adhesive forming a cluster.
|
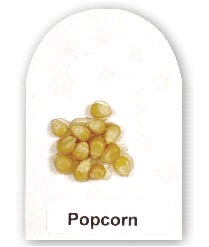
Contracted Braille
popcorn
Uncontracted Braille
popcorn
|
OBJECT
|
Radio
Materials:
A 1¾-inch square piece of fiberglass screenwire acquired at a hardware store
Assembly Instructions:
Apply a thin layer of adhesive onto one side of the screenwire. Place the screen in the center of the card above the print/braille label.
|
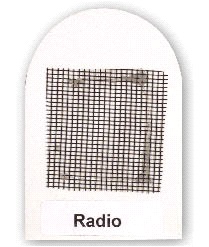
Contracted Braille
radio
Uncontracted Braille
radio
|
OBJECT
|
Rocking Chair
Materials:
A crescent moon shape
Assembly Instructions:
Adhere the crescent shape in the center of the card above the print/braille label. The shape should form a "smile."
|
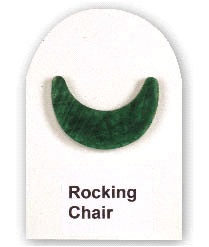
Contracted Braille
rock+
*air
Uncontracted Braille
rocking
chair
|
OBJECT
|
Snack
Materials:
White paper plate with ridges. One 2-inch square of brightly colored craft foam
Assembly Instructions:
Adhere the foam square to the center of the card above the print/braille label. Cut a small section of the paper plate retaining about 3 ridges of the plate. Apply adhesive to the underside of the ridges and adhere on top of the foam, allowing for a visible border of the colored foam.
|
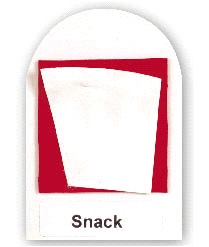
Contracted Braille
snack
Uncontracted Braille
snack
|
OBJECT
|
Soda
Materials:
One metal pull tab from an aluminum drinking can
Assembly Instructions:
Adhere the pull tab to the center of the card above the print/braille label. Apply glue to any sharp edges remaining on the pull tab.
|
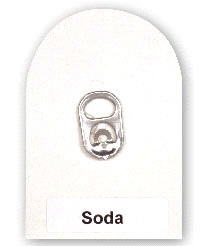
Contracted Braille
soda
Uncontracted Braille
soda
|
OBJECT
|
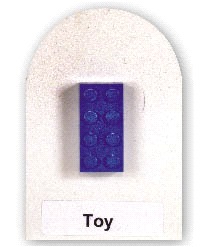
Toy
Materials:
A Lego® piece (not white)
Assembly Instructions:
Adhere the Lego piece to the center of the card above the print/braille label.
|
Contracted Braille
toy
Uncontracted Braille
toy
|
OBJECT
|
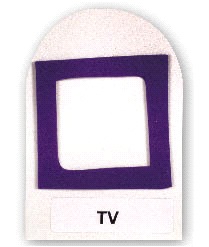
TV
Materials:
One piece of dark craft foam approximately 1¾-inches square
Assembly Instructions:
Fold the foam square diagonally and cut out a triangle leaving a ¼-inch frame. Adhere the frame to the center of the card above the print/braille label.
|
Contracted Braille
,,tv
Uncontracted Braille
,,tv
|
OBJECT
|
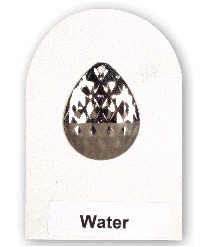
Water
Materials:
One metal fishing lure
Assembly Instructions:
Fill the cavity of the fishing lure with adhesive and place in the center of the card above the print/braille label. The fishing lure should be positioned in a way that forms a tear-drop shape.
|
Contracted Braille
wat]
Uncontracted Braille
water
|
TIME
|
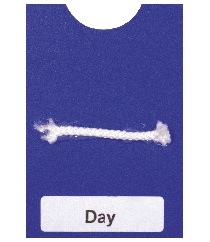
Day
Materials:
A piece of 1/8-inch wide rope or shoelace cut approximately 1¾-inches long
Assembly Instructions:
Apply glue to the complete length of the rope. Be sure to apply enough glue at the ends of the rope to prevent unraveling. Center the rope horizontally on the mounting card above the print/braille label.
|
Contracted Braille
"d
Uncontracted Braille
day
|
TIME
|
Sunday
Materials:
Same rope as for "DAY" symbol; a ¾-inch colorful, plastic rhinestone star obtained from a craft store
Assembly Instructions:
Position and adhere rope as in "DAY" card. Center and adhere star above the rope.
|
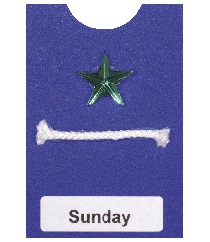
Contracted Braille
,sun"d
Uncontracted Braille
,sunday
|
TIME
|
Monday
Materials:
Same rope as for "DAY" symbol; 1½-inches by ¾-inch piece of thin wood available from craft store
Assembly Instructions:
Position and adhere rope as in "DAY" card. Center and adhere the wood above the rope.
|
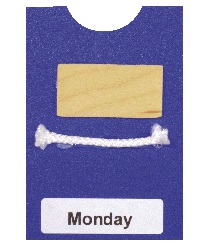
Contracted Braille
,mon"d
Uncontracted Braille
,monday
|
TIME
|
Tuesday
Materials:
Same rope as for "DAY" symbol; one brightly colored, 1-inch diameter pompom from a craft store
Assembly Instructions:
Position and adhere rope as in "DAY" card. Center and adhere pompom above the rope.
|
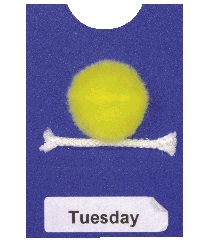
Contracted Braille
,tues"d
Uncontracted Braille
,tuesday
|
TIME
|
Wednesday
Materials:
Same rope as for "DAY" symbol; a second piece of the same rope cut approximately 2-inches long.
Assembly Instructions:
Position and adhere rope as in "DAY" card. Bend the second piece of rope to form a hump-like ("Hump Day") shape and adhere it above the horizontal rope.
|
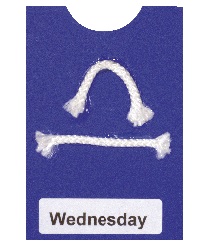
Contracted Braille
,w$nes"d
Uncontracted Braille
,wednesday
|
TIME
|
Thursday
Materials:
Same rope as for "DAY" symbol; a 2-inch by 1½-inch piece of Dycem® (non-skid shelf liner)
Assembly Instructions:
Position and adhere rope as in "DAY" card. Center and adhere the Dycem shape above the rope.
|
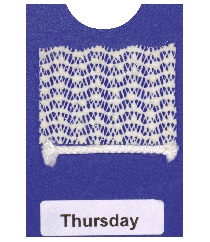
Contracted Braille
,?urs"d
Uncontracted Braille
,thursday
|
TIME
|
Friday
Materials:
Same rope as for "DAY" symbol; two plastic rhinestone squares
Assembly Instructions:
Position and adhere rope as in "DAY" card. Leaving a small gap between the squares, adhere them side by side above the rope.
|
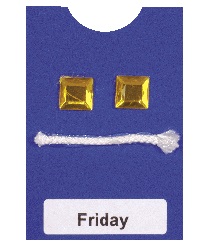
Contracted Braille
,fri"d
Uncontracted Braille
,friday
|
TIME
|
Saturday
Materials:
Same rope as for "DAY" symbol; a contrasting color of puff paint from craft store
Assembly Instructions:
Position and adhere rope as in "DAY" card. Draw the letter "S" with puff paint above the rope.
|
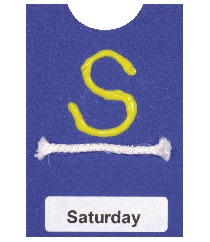
Contracted Braille
,satur"d
Uncontracted Braille
,saturday
|
TIME
|
Today
Materials:
Same rope as used for "DAY" symbol
Assembly Instructions:
Center and adhere the rope VERTICALLY in the center of the card above the print/braille label.
|

Contracted Braille
td
Uncontracted Braille
today
|
TIME
|
Yesterday
Materials:
Same as "TODAY" symbol; one colorful plastic rhinestone star from a craft store
Assembly Instructions:
Adhere the star to the LEFT of the vertically positioned rope above the print/braille label.
|
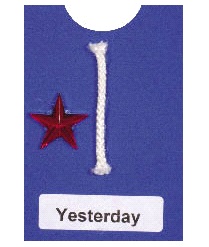
Contracted Braille
ye/]"d
Uncontracted Braille
yesterday
|
TIME
|
Tomorrow
Materials:
Same as "TODAY" symbol; one colorful plastic rhinestone star from a craft store
Assembly Instructions:
Adhere the star to the RIGHT of the vertically positioned rope above the print/braille label.
|
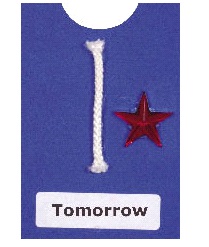
Contracted Braille
tm
Uncontracted Braille
tomorrow
|
EXPRESSION
|
Hello
Materials:
White rubber casing for insulated wires, large rubber bands, or nylon cable ties, approximately 4-inches long and 3/8-inch wide
Assembly Instructions:
Leaving a small gap between them, center and adhere the rubber pieces vertically and above the print/braille label.
|
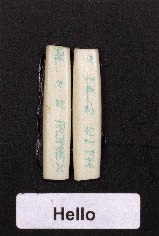
Contracted Braille
hello
Uncontracted Braille
hello
|
EXPRESSION
|
Goodbye
Materials:
White rubber casing for insulated wires, large rubber bands, or nylon cable ties approximately 4-inches long and 3/8-inch wide
Assembly Instructions:
Adhere the rubber pieces close to the vertical edges of the card and above the print/braille label.
|
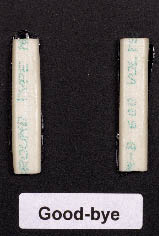
Contracted Braille
gdbye
Uncontracted Braille
goodbye
|
EXPRESSION
|
Yes
Materials:
Yellow jumbo pipe cleaner
Assembly Instructions:
Make a circle large enough to fit on the card. Twist the two ends of the pipe cleaner together making sure the sharp edges are underneath. Adhere to the center of the card above the print/braille label.
|
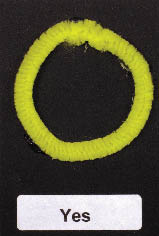
Contracted Braille
yes
Uncontracted Braille
yes
|
EXPRESSION
|
No
Materials:
Red jumbo pipe cleaner
Assembly Instructions:
Form a large circle similar in size to that used in "YES." Twist the two ends of pipe cleaner together making sure the sharp edges are underneath and not exposed. Attach a piece of pipe cleaner diagonally within the circle to form the international symbol for "NO." The two ends of the diagonal piece should be turned under to avoid sharp edges. Adhere the symbol to the card above the print/braille label.
|

Contracted Braille
no
Uncontracted Braille
no
|
EXPRESSION
|
Cancel
Materials:
Puff paint that contrasts with black background.
Assembly Instructions:
Using the puff paint, form a large "X" in the middle of the card above the print/braille label.
Tip:
To give the "X" added texture and visual interest, shake glitter on top of the paint and let dry.
|
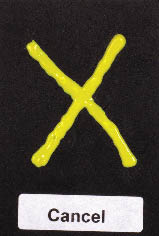
Contracted Braille
c.el
Uncontracted Braille
cancel
|
EXPRESSION
|
Choose
Materials:
Red and yellow jumbo pipe cleaners
Assembly Instructions:
Make miniature (approximately 1-inch in diameter) versions of "YES" and "NO" shapes using yellow and red pipe cleaners. Center and adhere the pipe cleaner shapes side by side on the card above the print/braille label.
|
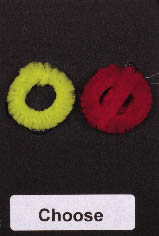
Contracted Braille
*oose
Uncontracted Braille
choose
|
EXPRESSION
|
Finished
Materials:
A pre-made miniature cardboard box obtained from a craft store.
Assembly Instructions:
Adhere opened box above the print/braille label.
|
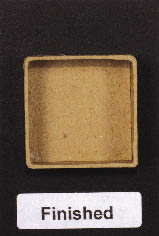
Contracted Braille
f9i%$
Uncontracted Braille
finished
|
EXPRESSION
|
Help
Materials:
Piece of medium-grade sandpaper
Assembly Instructions:
Cut the sandpaper into a plus sign approximately 1½-inches square. Center and adhere the sandpaper shape above the print/braille label.
|
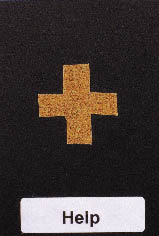
Contracted Braille
help
Uncontracted Braille
help
|
EXPRESSION
|
More
Materials:
Colorful beaded chain approximately 6-inches long available from fabric store
Assembly Instructions:
Form the beaded chain into the shape of a triangle and adhere the beaded triangle to the center of the card above the print/braille label.
|
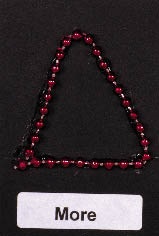
Contracted Braille
m
Uncontracted Braille
more
|
EXPRESSION
|
Yuck
Materials:
Hooked (rough) hook and loop piece and square piece of yellow craft foam
Assembly Instructions:
Center and adhere the foam square to the card above the print/braille label. Adhere the hook and loop piece on top of the foam square.
|
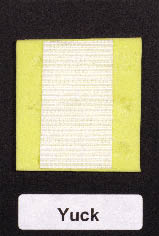
Contracted Braille
yuck
Uncontracted Braille
yuck
|
EXPANSION
|
Birthday
Materials:
Ribbon for gift wrapping (any type); APH card with predrilled holes
Assembly Instructions:
Thread the ribbon from the backside of the card so that the two ends can be tied into a bow on the front of the card. Fluff or curl the ribbon as needed.
|
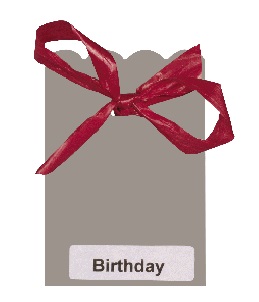
Contracted Braille
bir?"d
Uncontracted Braille
birthday
|
EXPANSION
|
Hot
Materials:
Yellow craft foam; red craft foam
Assembly Instructions:
Cut a red triangle to fit the size of the card and adhere to the center of the card above the print/braille label. Cut a yellow triangle, ¼-inch smaller than the red triangle. Cut another red triangle ¼-inch smaller than the yellow triangle. Adhere one on top of the other. The resulting symbol should be layered in appearance.
|
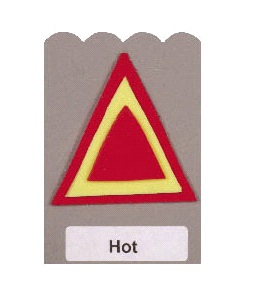
Contracted Braille
hot
Uncontracted Braille
hot
|
EXPANSION
|
Cold
Materials:
Craft foam circle approximately 1½-inches in diameter in a contrasting color, but different from those used for "HOT;" aluminum foil
Assembly Instructions:
Adhere the foam circle to the center of the card above the print/braille label. Squeeze and press the aluminum foil into a fl at circle approximately ¼-inch smaller than the foam circle. Adhere the foil circle on top of the foam circle.
|
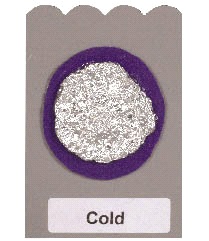
Contracted Braille
cold
Uncontracted Braille
cold
|
EXPANSION
|
Happy
Materials:
Two decorative iridescent pebbles (like those used to fill glass flower vases) or decorative buttons; one red jumbo pipe cleaner
Assembly Instructions:
Adhere the pebbles side by side forming the eyes in the upper portion of the card. Bend the pipe cleaner into a smile to fit the card and cut off the excess. Turn the two cut ends under to avoid sharp edges. Adhere the mouth below the eyes and above the print/braille label.
|

Contracted Braille
happy
Uncontracted Braille
happy
|
EXPANSION
|
Sad
Materials:
One piece of medium grade sandpaper; one red jumbo pipe cleaner
Assembly Instructions:
Cut two circles (eyes) out of the sandpaper and adhere in the upper portion of the card. Bend the pipe cleaner into a frown to fit the card and cut off the excess. Turn the two cut ends under to avoid sharp edges. Adhere the mouth below the eyes and above the print/braille label.
|
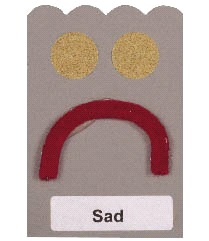
Contracted Braille
sad
Uncontracted Braille
sad
|
EXPANSION
|
Sick
Materials:
One yellow strip of craft foam about 1¾-inch by ¼-inch; red foam paper circle about the size of a dime; yellow puff paint
Assembly Instructions:
Adhere the red circle just above the print/braille label. Adhere the yellow foam strip above the red circle forming a vertical "mercury column." Use the puff paint to draw degree lines, about seven on each side with ¼-inch gaps between them, on both sides of the "thermometer."
Tip:
Craft stores sometimes have small bags of pre-cut foam shapes in a variety of colors and designs.
|
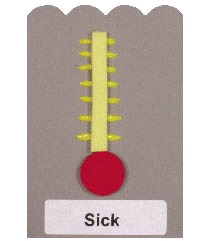
Contracted Braille
sick
Uncontracted Braille
sick
|
Appendix
Sample Cards from Field Test Sites
Throughout this section is a sampling of actual tactile cards constructed by a few participating field test sites. These cards reflect the philosophy stressed in the guidebook that encourages the individuality of each learner's visual and tactual needs. Again, the Pictorial Library provides a starting point, and not a recipe, for tactile card creation. Use your own expertise and the unique learning style of your learners to build ideal communication systems.
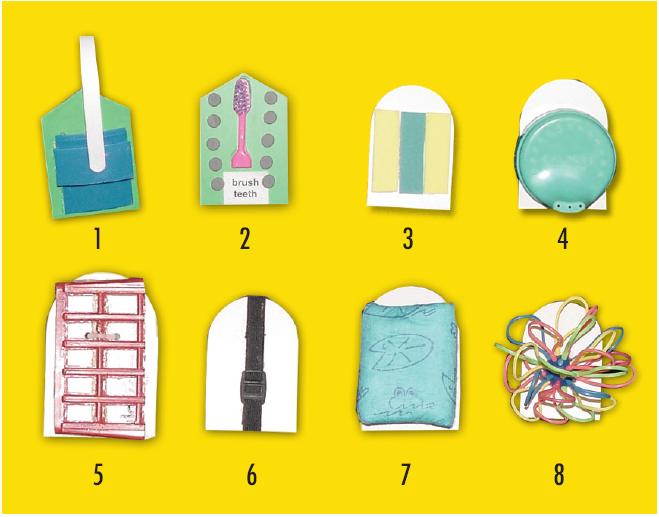 Cards from California School for the Blind
1. bathroom bucket
2. brush teeth (10x)
3. mattress
4. milk
5. playground
6. ride bike
7. swim diaper
8. wagon ride
 Cards from Tennessee School for the Blind
1. eat
2. play music
3. school
4. take medicine
5a-5c. work
(3 triangle work symbols)
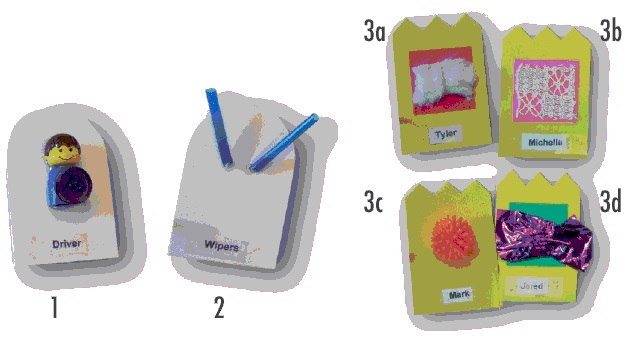
Cards from Perkins School for the Blind
1. driver
2. wipers
3a-3d.
personal name cards for students
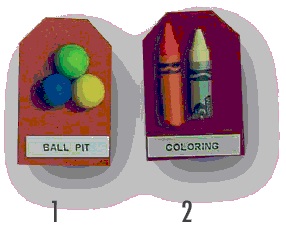 Cards from Home of the Innocents
1. ball pit
2. coloring
Further Reading
Blaha, R. (2001). Calendars for students with multiple impairments including deafblindness. Austin, TX: Texas School for the Blind and Visually Impaired.
Blischak, D.M. (1995). Thomas the writer: Case study of a child with severe physical, speech, and visual impairments. Language, Speech, and Hearing Services in Schools, 26(1), 11-10.
Brughera, A.R., Dlehorne, L.A., Durlach, N.I., Hall, S.M., Luongo, E., Plant, G. L., et al. (n.d.). Tactile communication of speech (RLE Project Report No 142). Cambridge, MA: Massachusetts Institute of Technology, Research Laboratory of Electronics. Retrieved May 15, 2002, from http://rieweb.mit.edu/ Publications/pr142/reed142.pdf.
Cress, C.J., Mathy-Laiko, P., & Angelo, J. (1989). Augmentative communication for children with deaf-blindness: Guidelines for decision-making. (Report No. 300-83-0237). Monmouth, OR: Office of Special Education and Rehabilitation Services. (ERIC Document Reproduction Service No. ED328005).
Goldware, M., & Silver, M. (1998, March). AAC strategies for young children with vision impairment and multiple disabilities. Paper presented at the CSUN Conference, Los Angeles, CA. Retrieved May 3, 2002, from http://www.cod.csun.edu/conf/1998/ proceedings/csun98 135.htm
Gray, C. (2000). Writing social stories with Carol Gray. Arlington, TX: Future Horizons, Inc.
Hagood, L. (1992, July). A standard tactile symbol system: Graphic language for individuals who are blind and unable to learn braille. P. S. News. Retrieved April 29, 2002, from http://www.tsbvi.edu/outreach/ seehear/archive/tactile.html
Heller, K.W., Alberto, P.A., & Bowdin, J. (1995). Interactions of communication partners and students who are deaf-blind: A model. Journal of Visual Impairment & Blindness, 89(5), 391-401.
Heller, K.W., Ware, S., Allgood, M.H., & Castelle, M. (1994). Use of dual communication boards with students who are deaf-blind. Journal of Visual Impairment & Blindness, 88(4), 368-376.
Mirenda, P. (1999). Augmentative and alternative communication techniques. In Downing, J.E. (Ed.), Teaching communication skills to students with severe disabilities (pp. 119-138). Maryland, PA: Paul H. Bookes Publishing Co., Inc.
Mirenda, P., & Locke, P.A. (1989). Comparison of symbol transparency in nonspeaking persons with intellectual disabilities. Journal of Speech and Hearing Disabilities, 54(2), 131-140.
Murray-Branch, J., Udavari-Soiner, A., & Bailey, B. (1991). Textured communication systems for individuals with severe intellectual and dual sensory impairments. Language, Speech, and Hearing Services in Schools, 22(1), 260-268.
Rowland, C., & Schweigert, P. (2000). Tangible symbol systems (second edition), making the right to communicate a reality for individuals with severe disabilities. Oregon: Design To Learn.
Smith, M., & Levack, N. (1996). Teaching students with visual and multiple impairments: A resource guide. Austin, TX: Texas School for the Blind and Visually Impaired.
Tactile colour in augmentative communication. (n.d.). Retrieved April 15, 2002, from http://ww.tactile.org/ Tactile%20Manual.html
Texas School for the Blind and Visually Impaired (2001, September). Tactile symbols directory to standard tactile symbol list. Retrieved May 15, 2002, from http: //www.tsbvi.edu/Education/vmi/tactilesymbols.htm

AMERICAN PRINTINGG HOUSE
FOR THE BLIND, INC.
1839 Frankfort Avenue
Louisville, KY 40206 USA
Phone: 502-895-2405 -- Toll Free: 800-223-1839
Fax: 502-899-2274
E-mail: [email protected] -- Web site: www.aph.org
Tactile Connections:
Symbols for Communication
Kit Catalog Number: 1-08837-00
Large Print Guidebook: 7-08837-00